Page History
...
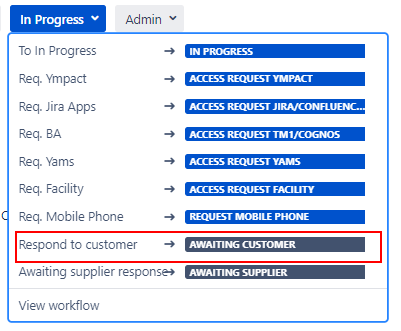
Statuses SD: Access Request Onboarding Workflow
- Filling Issue attributes: Ticket Ticket is created, automation rules are running at in the background to fill issue field values.
- Awaiting assignment: Onboarding ticket ready for being picked up by IT Servicedesk; Assign ticket to a an SD-Agent.
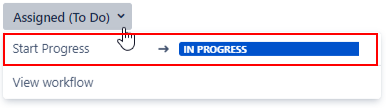
- Assigned (to do) : work has not started, Onboarding issue has been assigned to a an SD-Agent.
- In Progress: Issue is in Progress (work ticket can always move back to this status);.
- Awaiting Customer: Used when more information/response from a customer (Reporter or Requested participant) is required in order to move forward with a issueticket.
Detailed information for this status can be found further below under: Awaiting Customer status. - Awaiting Supplier: Used when more information/response from a supplier is required.
Detailed information for this status can be found further below under: Awaiting supplier status. - Access request Ympact: Triggers automatic creation: Sub-Task Access request Ympact.
- Access request Yams: Triggers automatic creation: Sub-Task Access Request Yams.
- Access request TM1/Cognos: Triggers automatic creation: Sub-Task Access request TM1/COGNOS.
- Access request Jira/Confluence/Bitbucket: Triggers automatic creation: Task Jira/Confluence/Bitbucket.
- Request Mobile Phone: Triggers Triggers automatic creation: Sub-Task Request Mobile Phone.
- Access Request Facility: Triggers Triggers automatic creation: Task Facility.
- Closed: Onboarding of the new employee/user has been completed.
Awaiting Customer status Anchor Awaiting Customer status Awaiting Customer status
| Awaiting Customer status | |
| Awaiting Customer status |
The Awaiting Customer status is used when more information/response from a customer (Reporter or Requested participant) is required in order to move forward with a issueticket.
Please also read page How to use @mentions to tag a reporter or a commenter directly.
- Awaiting Customer status can be triggered via the Respond to customer button.
When selecting this option a pop up frame will be opened: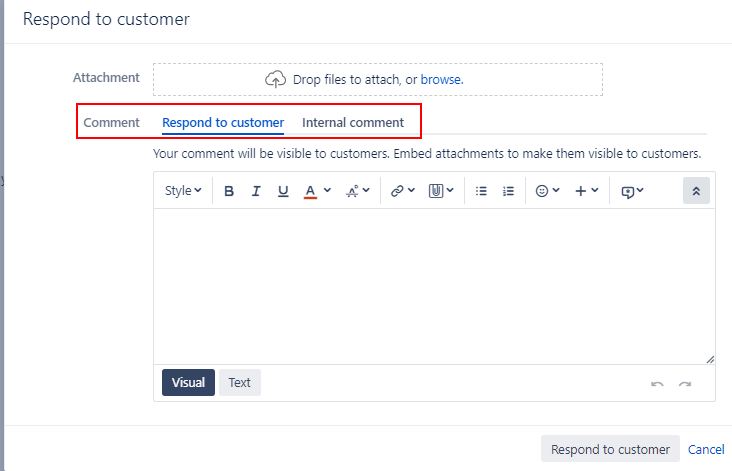
- Check Comment selection (see marked in red in the above screenshot).
Default for comment is set to Internal comment. The Internal comment option can be used for only triggering a status update to Awaiting customer.
Use comment: Respond to customer if your message should be shared with the the reporter and requested participants.- Optional: Add comment to the comment section.
- Optional: Add comment to the comment section.
- Select the Respond to customer button.
- After using the Respond to customer button is pressed the comment will be added to the ticket and status will be changed to Awaiting customer. Description area is optional.

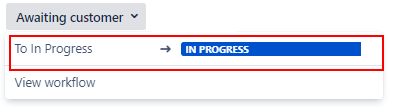
- Response from customer received:
- Via issue: Status will automatically changed back to status In Progress.
- Manually: Select status In Progress.
...
- Awaiting Supplier status can be triggered via the Awaiting Supplier button.

When selecting this option a pop up frame will be opened:
- Check Comment selection (see marked in red in the above screenshot).
Default for comment is set to Internal comment. The Internal comment option can be used for only triggering a status update to Awaiting Supplier
Use comment: Respond to customer if your message should be shared with the the reporter and requested participants.- Optional: Add comment to the comment section.
- Optional: Add comment to the comment section.
- Select the Awaiting supplier response button.
- After reply from the Awaiting supplier response button is pressed the comment will be added to the ticket and status will be changed to Awaiting Supplier. Description area is optional.

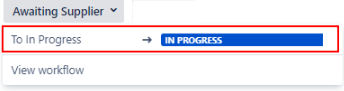
- Response from supplier received:
- Via issue: Status will automatically changed back to status In Progress.
- Manually: Select status In Progress.
...
Tasks and Sub-Tasks are triggered via the Access request XXXXX and Request Mobile Phone workflow transitions in the SD: Access Request Onboarding Workflow

Statuses SD: Simple 3 Step workflow
- To do: work has not started, issue ticket can be assigned (work ticket can always move back to this status);.
- In progress: Issue is in Progress (work ticket can always move back to this status);.
- Done: the work is completed, resolution is automatically set to "Done";.
- Canceled: No further work will be done on this issue, it is not required anymore or has become obsolete. Resolution is automatically set to "Canceled" a comment Screen will pop up to include information why the issue has been canceled (can be selected from any status).
If a Issue ticket is already closed and will be moved back to status "To Do" or "In Progress" the resolution will be cleared.
...
- Onboarding ticket is created by HR, reporter = HR-Jira@yamaha-motor.eu [YME HR].
- After creation ticket will be transitioned to status Awaiting assignment.
- SD-agent allocates ticket to to him/herself.
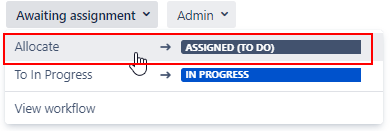
- SD-agent set issue to In Progress.
After transitioning the Onboarding ticket to status In Progress the Onboarding form will automatically being attached.
Please make sure you have the Forms tab open to view the form.

The form is directly visible in the customer portal. - SD-agent adds Manager of the new user as Requested participant
- Add in the comment section a canned response "SD_Onboarding NEW" and adjust the information between brackets[ ]
- Then click on Share with Customer to send the message.


- Manager receives a notification via e-mail.
For the manager it will look like below in the Customer portal: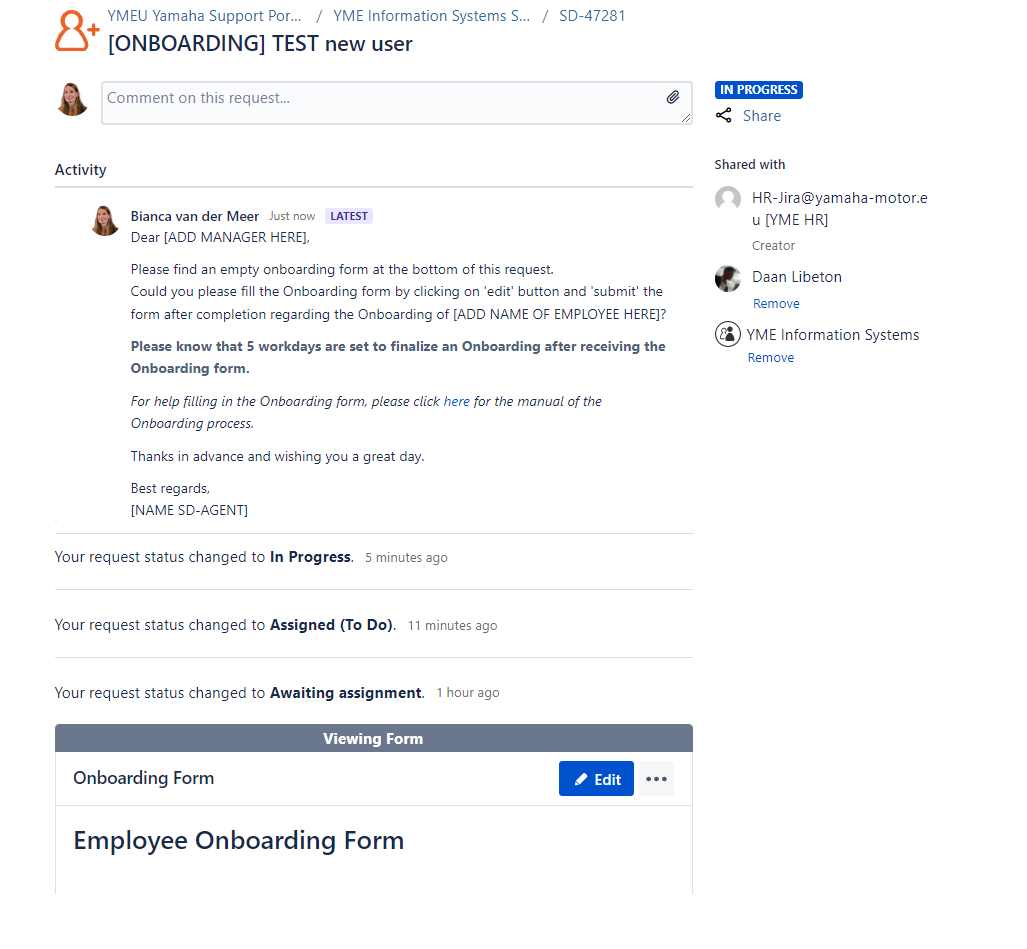
- Manager action:
- Manager saves and submit form in customer portal.

The form will be locked for editing. Print screen from original onboarding ticket.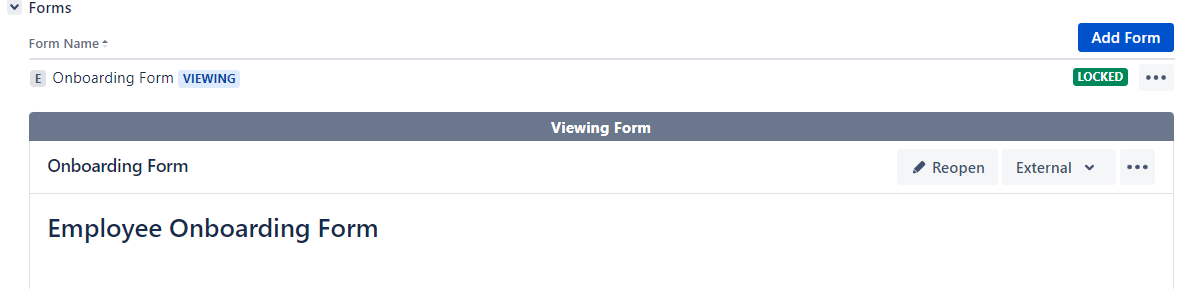
- Form will be attached as PDF. This PDF file is not visible in the customer portal, only in the original ticket for SD-agents.

- Manager saves and submit form in customer portal.
- Add a Internal comment to the Onboarding ticket:
copy [Example User NAME, USERID] to [New User NAME, USERID]
NOTE: This internal comment will be copied in the next step when requesting Sub-Tasks and Tasks.
Sub-task and Task can be requested according to selection made in the Onboarding Form.
Note All communication with the Manager/User will be done through the original Onboarding ticket!
- After all linked Sub-task and Tasks are completed the Onboarding ticket can be closed by the SD-Agent.
- Use a canned response:
- SD-Agents send mail to the new Employee
- Use a canned response:
...
Overview
Content Tools