Page History
...
You can manage your Jira settings (e.g. your password, email address, or the format in which you would like to receive email notifications) in your user profile.
Your user profile also displays recent work in the Activity Stream, and contains useful shortcuts to issues you have been working on or reported.
Change your Avatar
Select![]()
...
or your current avatar to change the image that appears next to your name in Jira.
Change default language in Jira
...
More detailed information about default Jira setup for issues and field explanation can be found on the following Atlassian page: view an issue.
Comments
Adding comments to an issue is a useful way to record additional detail about an issue, and collaborate with team members.
Comments are shown in the Comments tab of the Activity section when you view an issue.
In JIRA Service Desk projects, comments are segregated by internal vs external visibility. Meaning that I am able to select whether I want to Share with customer or Comment Internally.
- Share with customer makes the comment visible to everyone who can see the issue/request. (Jira Service Management agents , reporter and participants)
When this button is used the reporter and all participants will receive a notification by e-mail. - Internal comments are not shown on the portal view of the issue.
When this button is used then only Jira Service Management agents (licensed Jira Service Management user) are able to see the comment.
Note: Jira Service Management agents (licensed users) are able to see both internal and external comments

| Tip |
|---|
Keyboard shortcut for Jira Software: Press M on your keyboard to jump straight into the comment field and start typing. |
Text help
...
Adding code to a comment
For adding a code block to a comment select + and then Code in the formatting toolbar. In the code block you can type in as much code as you want, and select the language for syntax highlighting.
If you've already typed in your code, select the text and press CMD/Ctrl+Shift+M to turn that bit of text into a code snippet,
All the optional parameters of {panel} macro are valid for {code} too. The default language is Java but you can specify others too, including: ActionScript, Ada, AppleScript, bash, C, C#, C++, CSS, Erlang, Go, Groovy, Haskell, HTML, JavaScript, JSON, Lua, Nyan, Objc, Perl, PHP, Python, R, Ruby, Scala, SQL, Swift, VisualBasic, XML and YAML.
For selecting the correct syntax highlighting change the setting to Text. and adjust code:java to any of the above languages. When done you can change back to Visual.
Note: {code:sql} Jira recognizes -- comment but not /* comment */, which is supported by the Transact-SQL (T-SQL) language in Microsoft SQL Server. Please add syntax highlighting for that, too. It could be part of {code:sql} or have a distinct language identifier such as {code:mssql} or {code:t-sql}.


Comment sorting
Comments can be sorted by newest or oldest first.


If there are more then 10 comments in an issue you need to click "Load 10 newer comments" . 
The Comment bar is not customizable, to add a comment you need to scroll down on the issue page.
Work around is to collapse ![]() the Activity tab when having more then 10 comments to add a new comment.
the Activity tab when having more then 10 comments to add a new comment.
Please note that settings are saved when you collapse a section, when opening a new Jira issue make sure you have opened the section again.
Pinned Comments (Jira Software)
Keep your team updated on the most important parts of a conversation by pinning comments in issues. This option is only available for Jira Software, not for Jira Service Management!
All important comments you’ve pinned will always appear at the top of the Comments tab, above the other issue comments:
- Pinned comments: a section that contains all comments that are currently pinned on an issue.
- All comments: a section with all issue comments, including the pinned ones.
...
- Regardless of the sorting applied, pinned comments always appear in the same order, with the most recent ones displayed at the top.
- You can pin up to five comments on a single issue, being sure that only essential information is pinned and other users won’t miss a thing.
- Both pinned comments and all other comments are wrapped up in separate sections - Pinned comments and All comments so you know exactly where to look for the needed information.
- Pinned comments appear in both sections. You can edit, unpin, or delete (only added by you) them in either place.
Mentions (tagging)
...
The following users can being mentioned in Jira:
- Reporter
- Commenter
- Asignee
- Licensed users: YMEUACJiraServiceDeskUsers / YMEUACJiraYMEPAServicedeskUsers (Jira Servicedesk) YMEUACJiraUsers (Jira Software)
Requested participants of a issue which are only Jira Servicedesk portal customers cannot being mentioned, unless they have left a comment in the ticket, then they will become a commenter on the issue.
People already involved in the issue, like the reporter or a commenter, will be listed first in the user list so you can select them faster. Note that the users you mention will be notified once you save the issue description or comment.
User mention via comment using autocomplete
To mention someone using autocomplete, type '@' in the editor then start typing their name. Choose the person you want to mention from the list of suggestions.
Jira will suggest people you've mentioned previously (after yourself, of course).
...
It then continues to suggest matches as you type. If you've not mentioned the person recently, we'll also include information about whether they've commented or contributed to the current page, to help you find the right person, fast.
...
User Mention via editor in the toolbar
If you'd rather use the Insert menu, choose Insert > User Mention then search for and select the user you want to mention.


Jira mentions filter
Following filter can being used to display all unresolved tickets of the last 7 days where you have being mentioned in.
This filter can also being added to your dashboard.
See Instructions under Editing dashboards how to add the filter to a dashboard.
Workflow
A Jira Workflow has three basic components: statuses, transitions and resolutions.
Statuses represent the position of an issue in its workflow, state of a task.
Transitions informs how a piece of work can move between statuses.
Resolutions are the ways in which an issue can be closed.
In a Jira issue you can check all the issue statuses and transitions as well as view your issue workflow with a single click from the Issue status menu.

- Issue status menu label: a trigger menu button that displays the current status of an issue (1).
- Issue status menu: contains a set of issue statuses (3), transitions (2), and current issue workflow (4).
Example for Project Yamaha Applications Support Desk (SD): 

By hovering over the arrows and the workflow the transition of this specific status is shown which can be chosen as next/previous step.

Another example of a more simplified Jira Service Management Workflow:
A Jira issue can be moved by using a specific transaction button or if not available via the Issue status menu.
When using a Board an issue can be transitioned to another workflow status by dragging and dropping the issue from one column to another.
Depending on authorization, rights are granted to each specific group of users and make issue transitions and statuses available.

Issue creation
Create an issue via the Jira Customer portal
Users can create a new issue via the Jira Customer Portal, at Yamaha it is called Yamaha Motor Europe support portal. Instructions of the portal can be found here: Yamaha Support Portal Guide
Service management issues should only be created via the Jira Customer Portal as these can be submitted by pre-set forms.
Create an issue from the top navigation bar, anywhere in Jira for Jira Software or Jira Core projects
Users/Agents (licensed user) can use the ![]() button anywhere in Jira from the top bar. The Create button should not being used for Service management (Servicedesk) issues!
button anywhere in Jira from the top bar. The Create button should not being used for Service management (Servicedesk) issues!
![]()
When using the create button the correct project and issue-type needs to be chosen and some other fields as well.
Create an issue On the backlog
Via a Board a new issue can be created via the + Create issue button at the bottom of the screen.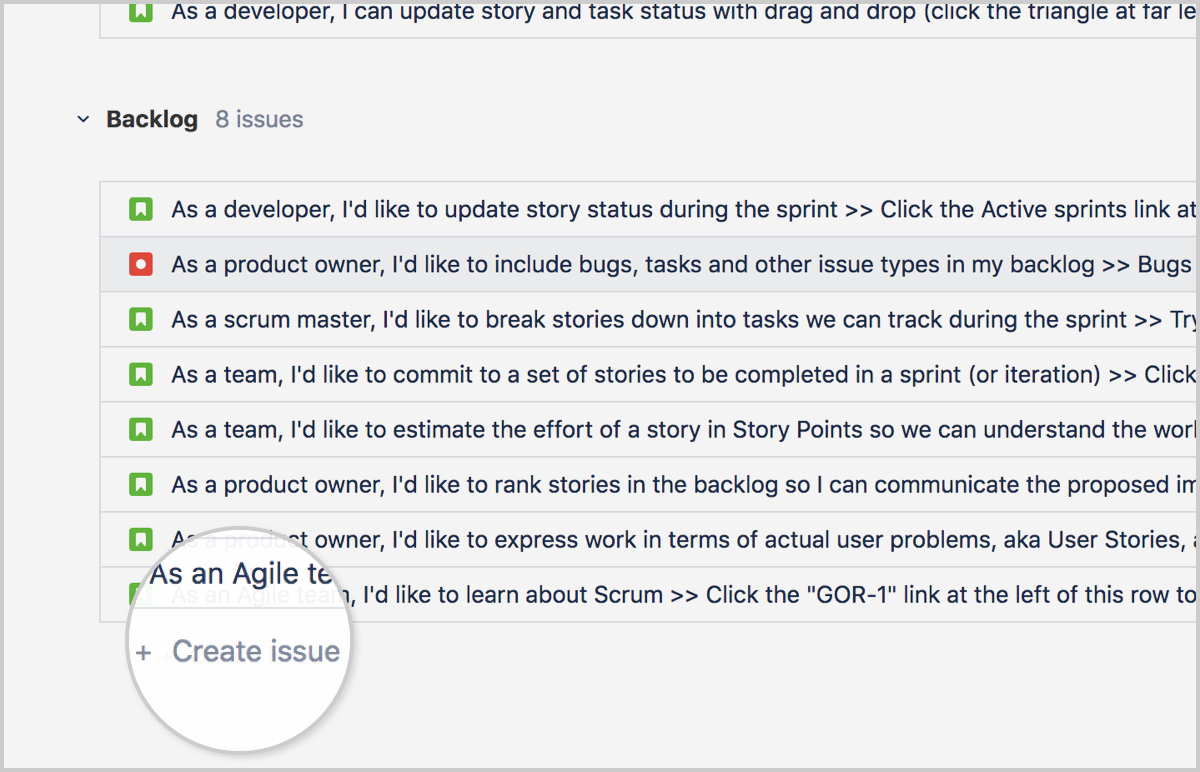
Create an Issue on your board (team-managed projects only)
...
Subtask creation
Issues can also have sub-tasks that are assigned and tracked individually. You might create sub-tasks for any of the following reasons:
- To split an issue into even smaller chunks
- To allow various aspects of an issue to be assigned to different people
- To create a to-do list for an issue
To create a sub-task:
- Navigate to an issue, and select more ( ••• ) > Create Sub-Task.
- Fill in the details as needed, and then click Create.
or go to the Issue card in the board and select Create Sub-Task

Issue links
Jira Projects issues and Confluence pages can be linked to a specific Jira issue. These links can be found in a Jira issue under section Issue Links
Confluence links to a Jira issue can be found under Section Issue Links - Mentioned in
Example:

Subtasks are automatically linked to the original ticket.
In the original ticket you can see all linked sub-Tasks

Create manually a new issue link to Jira issue or Confluence or Weblink
To create a new manual link open the issue you wish to link to another issue.
Please note that that this manual action is only needed for issues that did not follow the correct workflow or if it need to be linked to a different or parent/child issue as well.
Confluence pages can directly be linked to a Jira ticket. Instructions can be found on the following page: How-to use links and anchors (bookmarks) in Confluence.
...
Select More > Link to display the Link dialog box.
Ensure that the Jira Issue item is selected at the left of the dialog box and then choose the type of link to be created from the This issue drop-down list


Share a issue link with a customer
When a licensed Jira Service Management user opens issue, the link differs from the public link used for the Customer Portal.
If the Licensed user wants to share an issue to a customer, use the view customer request button, and then copy the link for sharing.
This link can only be retrieved in licensed mode:
- Open a Jira issue
- Select at right column under Servicedesk request View Customer request

- A new page will be opened with a view of the request in the customer portal.
This link can be shared to a user. Note: to view the ticket the user must be linked in the ticket as reporter or participant or manager.
Link for licensed user: https://support.yamnet.com/browse/SD-7312
Link for Customer: https://support.yamnet.com/servicedesk/customer/portal/1/SD-7312
Issue types
Standard Issue types
An Issue Type is a way issues are classified in a Jira project and has a Icon that allows us to quickly recognize it. There are standard types that come with Jira and additional custom types.
Jira Software comes with five standard issue types (Story, Task, Bug, Subtask, and Epic) so issues can have different fields, different workflows, or both, within the same Jira project.
...
Issue Type
...
Atlassian’s Definition
...
Example Issue Summary (Title)
...
![]() Story
Story
...
OR
Make brownies for bake sale
...
![]() Task
Task
...
![]() Sub-task
Sub-task
...
![]() Bug
Bug
...
![]() Epic
Epic
...
Relation of the issue types is as following:


If you've added sub-tasks to an issue, and need to reorder them, you can drag and drop them on the issue navigator view of the parent issue.
If you're using a board in Jira Software, you can also reorder the sub-tasks on the board view. However, these two methods are independent of each other. Reordering sub-tasks on the parent issue will not reorder tasks on an existing board, and vice-versa.
Additionally, Jira Service management adds four more standard types for support projects.
...
Issue Type
...
Atlassian’s Definition
...
Example Issue Summary (Title)
...
![]() Incident
Incident
...
![]() Service request
Service request
...
![]() Change
Change
...
![]() Problem
Problem
...
OR
Train users on gas stove safety
Custom issue types
Per project additional Custom issue types can exists. These were either added by Jira administrators, by additional Jira functions, or by third party apps and add-ons.
...
Search
There are several search options in Jira which can help if your are looking for an issue.
The first step in searching for issues is to define the criteria for your new search. You can define your search criteria in three different ways: using the quick search, using the basic search, or using the advanced search.
For each of search options the following Syntax for searching text fields can be applied.
Via search results bulk changes can be made, this option should only be used by a Jira Admin. If a bulk update is required a SD request can be submitted including the search URL.
...
The quick search is the fastest way to define search criteria. However, it is less precise than other search methods for complex queries (e.g. project = Jira AND status = Open AND priority = High).
It is most useful when your search criteria is not complex, for example, you know the project key and some key words for an issue.
To use the quick search: Enter your search criteria in the search box in the header bar of Jira and press Enter.
Tip: If you know the issue key or project key, enter it before other search terms, e.g. "JRA help link is broken".

More detailed information can be found on the following Atlassian page: Quick searching
...
The basic search is more precise than the quick search, but easier to use than the advanced search.
It provides a user-friendly interface that lets you define complex queries, without needing to know how to use JQL (advanced searching).
To use the basic search: Navigate to Issues (in header) > Search for issues, then enter your search criteria.
Tip: If the advanced search is shown instead of the basic search, click Basic next to the ![]() icon.
icon.

Issue types
Standard Issue types
An Issue Type is a way issues are classified in a Jira project and has a Icon that allows us to quickly recognize it. There are standard types that come with Jira and additional custom types.
Jira Software comes with five standard issue types (Story, Task, Bug, Subtask, and Epic) so issues can have different fields, different workflows, or both, within the same Jira project.
Issue Type | Atlassian’s Definition | Example Issue Summary (Title) |
|---|---|---|
| Functionality request expressed from the perspective of the user | As a bake sale attendee, I would like to eat brownies because I’m allergic to cake OR Make brownies for bake sale |
| Task that needs to be done | Bake a cake |
| Smaller task within a larger piece of work | Mix cake ingredients |
| Problem that impairs product or service functionality | Cake is burnt |
| Large piece of work that encompasses many issues | Make deserts for bake sale |
Relation of the issue types is as following:
If you've added sub-tasks to an issue, and need to reorder them, you can drag and drop them on the issue navigator view of the parent issue.
If you're using a board in Jira Software, you can also reorder the sub-tasks on the board view. However, these two methods are independent of each other. Reordering sub-tasks on the parent issue will not reorder tasks on an existing board, and vice-versa.
Additionally, Jira Service management adds four more standard types for support projects.
Issue Type | Atlassian’s Definition | Example Issue Summary (Title) |
|---|---|---|
| System outage or incident | The kitchen caught fire yesterday |
| General request from a user for a product or service | Fix microwave damaged during kitchen fire |
| Rollout of new technologies or solutions | Change the gas stove to an electric hot plate |
| Track underlying causes of incidents | The electric hot plate doesn’t get hot enough OR Train users on gas stove safety |
Custom issue types
Per project additional Custom issue types can exists. These were either added by Jira administrators, by additional Jira functions, or by third party apps and add-ons.
For example at YME for Yamaha Motor Portfolio Project (YPM) issue type ![]() Programme and
Programme and ![]() Project have been created by a Jira Administrator and for XRAY (test management tool) add-on the following issue types are created:
Project have been created by a Jira Administrator and for XRAY (test management tool) add-on the following issue types are created: ![]() Test,
Test, ![]() Test execution ,
Test execution ,![]() Test Plan,
Test Plan, ![]() Test Set.
Test Set.
Workflow
A Jira Workflow has three basic components: statuses, transitions and resolutions.
Statuses represent the position of an issue in its workflow, state of a task.
Transitions informs how a piece of work can move between statuses.
Resolutions are the ways in which an issue can be closed.
In a Jira issue you can check all the issue statuses and transitions as well as view your issue workflow with a single click from the Issue status menu.
- Issue status menu label: a trigger menu button that displays the current status of an issue (1).
- Issue status menu: contains a set of issue statuses (3), transitions (2), and current issue workflow (4).
Example for Project Yamaha Applications Support Desk (SD):
By hovering over the arrows and the workflow the transition of this specific status is shown which can be chosen as next/previous step.
Another example of a more simplified Jira Service Management Workflow:
A Jira issue can be moved by using a specific transaction button or if not available via the Issue status menu.
When using a Board an issue can be transitioned to another workflow status by dragging and dropping the issue from one column to another.
Depending on authorization, rights are granted to each specific group of users and make issue transitions and statuses available.
Working with issues
Issue creation
Create an issue via the Jira Customer portal
Users can create a new issue via the Jira Customer Portal, at Yamaha it is called Yamaha Motor Europe support portal. Instructions of the portal can be found here: Yamaha Support Portal Guide
Service management issues should only be created via the Jira Customer Portal as these can be submitted by pre-set forms.
Create an issue from the top navigation bar, anywhere in Jira for Jira Software or Jira Core projects
Users/Agents (licensed user) can use the ![]() button anywhere in Jira from the top bar. The Create button should not being used for Service management (Servicedesk) issues!
button anywhere in Jira from the top bar. The Create button should not being used for Service management (Servicedesk) issues!
![]()
When using the create button the correct project and issue-type needs to be chosen and some other fields as well.
Create an issue On the backlog
Via a Board a new issue can be created via the + Create issue button at the bottom of the screen.
Create an Issue on your board (team-managed projects only)
In a teams board the+sign can be used to add a new issue to the team board.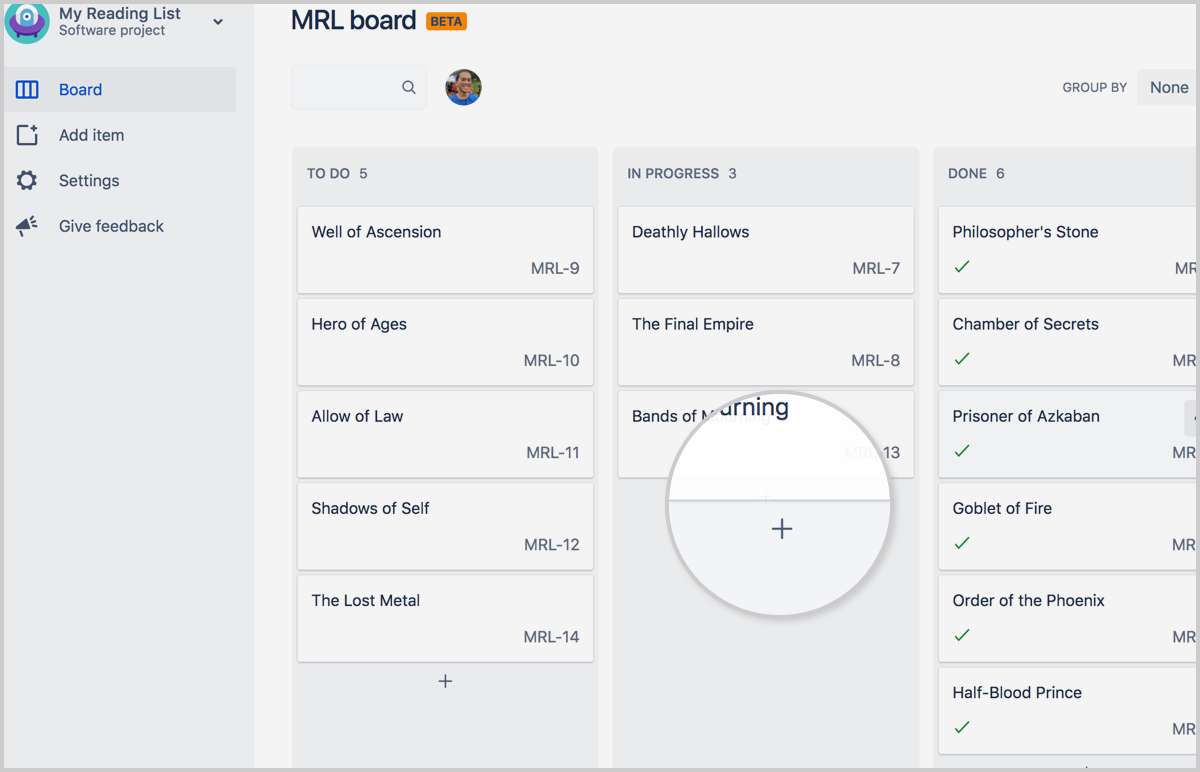
Subtask creation
Issues can also have sub-tasks that are assigned and tracked individually. You might create sub-tasks for any of the following reasons:
- To split an issue into even smaller chunks
- To allow various aspects of an issue to be assigned to different people
- To create a to-do list for an issue
To create a sub-task:
- Navigate to an issue, and select more ( ••• ) > Create Sub-Task.
- Fill in the details as needed, and then click Create.
or go to the Issue card in the board and select Create Sub-Task
Issue links
Jira Projects issues and Confluence pages can be linked to a specific Jira issue. These links can be found in a Jira issue under section Issue Links
Confluence links to a Jira issue can be found under Section Issue Links - Mentioned in
Example:
Subtasks are automatically linked to the original ticket.
In the original ticket you can see all linked sub-Tasks
Create manually a new issue link to Jira issue or Confluence or Weblink
To create a new manual link open the issue you wish to link to another issue.
Please note that that this manual action is only needed for issues that did not follow the correct workflow or if it need to be linked to a different or parent/child issue as well.
Confluence pages can directly be linked to a Jira ticket. Instructions can be found on the following page: How-to use links and anchors (bookmarks) in Confluence.
Parent = Main (original) issue
Child = Sub issue from main issue
Select More > Link to display the Link dialog box.
Ensure that the Jira Issue item is selected at the left of the dialog box and then choose the type of link to be created from the This issue drop-down list
Share a issue link with a customer
When a licensed Jira Service Management user opens issue, the link differs from the public link used for the Customer Portal.
If the Licensed user wants to share an issue to a customer, use the view customer request button, and then copy the link for sharing.
This link can only be retrieved in licensed mode:
- Open a Jira issue
- Select at right column under Servicedesk request View Customer request
- A new page will be opened with a view of the request in the customer portal.
This link can be shared to a user. Note: to view the ticket the user must be linked in the ticket as reporter or participant or manager.
Link for licensed user: https://support.yamnet.com/browse/SD-7312
Link for Customer: https://support.yamnet.com/servicedesk/customer/portal/1/SD-7312
Comments
Adding comments to an issue is a useful way to record additional detail about an issue, and collaborate with team members.
Comments are shown in the Comments tab of the Activity section when you view an issue.
In JIRA Service Desk projects, comments are segregated by internal vs external visibility. Meaning that I am able to select whether I want to Share with customer or Comment Internally.
- Share with customer makes the comment visible to everyone who can see the issue/request. (Jira Service Management agents , reporter and participants)
When this button is used the reporter and all participants will receive a notification by e-mail. - Internal comments are not shown on the portal view of the issue.
When this button is used then only Jira Service Management agents (licensed Jira Service Management user) are able to see the comment.
Note: Jira Service Management agents (licensed users) are able to see both internal and external comments
| Tip |
|---|
Keyboard shortcut for Jira Software: Press M on your keyboard to jump straight into the comment field and start typing. |
Text help
Via + you can select Text help, this will bring you to Text formatting notification Help.
In here you can find a explanation for text formatting and advanced formatting like adding code in a comment.
Adding code to a comment
For adding a code block to a comment select + and then Code in the formatting toolbar. In the code block you can type in as much code as you want, and select the language for syntax highlighting.
If you've already typed in your code, select the text and press CMD/Ctrl+Shift+M to turn that bit of text into a code snippet,
All the optional parameters of {panel} macro are valid for {code} too. The default language is Java but you can specify others too, including: ActionScript, Ada, AppleScript, bash, C, C#, C++, CSS, Erlang, Go, Groovy, Haskell, HTML, JavaScript, JSON, Lua, Nyan, Objc, Perl, PHP, Python, R, Ruby, Scala, SQL, Swift, VisualBasic, XML and YAML.
For selecting the correct syntax highlighting change the setting to Text. and adjust code:java to any of the above languages. When done you can change back to Visual.
Note: {code:sql} Jira recognizes -- comment but not /* comment */, which is supported by the Transact-SQL (T-SQL) language in Microsoft SQL Server. Please add syntax highlighting for that, too. It could be part of {code:sql} or have a distinct language identifier such as {code:mssql} or {code:t-sql}.
Comment sorting
Comments can be sorted by newest or oldest first.
If there are more then 10 comments in an issue you need to click "Load 10 newer comments" .
The Comment bar is not customizable, to add a comment you need to scroll down on the issue page.
Work around is to collapse ![]() the Activity tab when having more then 10 comments to add a new comment.
the Activity tab when having more then 10 comments to add a new comment.
Please note that settings are saved when you collapse a section, when opening a new Jira issue make sure you have opened the section again.
Pinned Comments (Jira Software)
Keep your team updated on the most important parts of a conversation by pinning comments in issues. This option is only available for Jira Software, not for Jira Service Management!
All important comments you’ve pinned will always appear at the top of the Comments tab, above the other issue comments:
- Pinned comments: a section that contains all comments that are currently pinned on an issue.
- All comments: a section with all issue comments, including the pinned ones.

- Regardless of the sorting applied, pinned comments always appear in the same order, with the most recent ones displayed at the top.
- You can pin up to five comments on a single issue, being sure that only essential information is pinned and other users won’t miss a thing.
- Both pinned comments and all other comments are wrapped up in separate sections - Pinned comments and All comments so you know exactly where to look for the needed information.
- Pinned comments appear in both sections. You can edit, unpin, or delete (only added by you) them in either place.
Mentions (tagging)
Mentions (often known as @mentions) are a useful way of drawing someone's attention to a issue or a comment.
When you mention a user, they'll receive a notification by email.
You could also reassign a issue to a colleague for consultation, but that’s a fairly heavyweight operation to just ask a question.
By using @mentions, you can quickly direct conversation in comments to get needed feedback and keep you moving forward.
That way the issue always stays assigned to you and on your radar.
The following users can being mentioned in Jira:
- Reporter
- Commenter
- Asignee
- Licensed users: YMEUACJiraServiceDeskUsers / YMEUACJiraYMEPAServicedeskUsers (Jira Servicedesk) YMEUACJiraUsers (Jira Software)
Requested participants of a issue which are only Jira Servicedesk portal customers cannot being mentioned, unless they have left a comment in the ticket, then they will become a commenter on the issue.
People already involved in the issue, like the reporter or a commenter, will be listed first in the user list so you can select them faster. Note that the users you mention will be notified once you save the issue description or comment.
User mention via comment using autocomplete
To mention someone using autocomplete, type '@' in the editor then start typing their name. Choose the person you want to mention from the list of suggestions.
Jira will suggest people you've mentioned previously (after yourself, of course).

It then continues to suggest matches as you type. If you've not mentioned the person recently, we'll also include information about whether they've commented or contributed to the current page, to help you find the right person, fast.
Select the person you want to mention and it will be added to the issue comment box.
User Mention via editor in the toolbar
If you'd rather use the Insert menu, choose Insert > User Mention then search for and select the user you want to mention.
Jira mentions filter
Following filter can being used to display all unresolved tickets of the last 7 days where you have being mentioned in.
This filter can also being added to your dashboard.
See Instructions under Editing dashboards how to add the filter to a dashboard.
Queues (Service Management only)
Customer requests are organized into queues. Queues let you quickly view, triage and assign requests as they come in.
They also provide high-level information on an issue; usually a summary, status, and customer name.
There are pre-configured queues and custom queues created by a Jira Admin/Project Admin.
Custom queues allow you to choose the name for the queue, determine what requests are filtered into the queue, and what columns appear in the queue.
Edit an existing queue
- Go to your Service Management project

- Select Queues in the right panel

- Select the target queue from the list via Switch Queues

- Click on the three dots menu in the upper right corner. You can also edit queues by using the pen icon on the upper left Queues panel.
- Select Edit queue. Edit a queue in the Queues for Jira Service Management app.

- Make changes.
- Click Save.
Sort requests within a queue
From a queue, you can sort your requests based on your columns by clicking the column name.
To sort requests:
From your service project, go to Queues.
Select the queue you want to sort requests in.
Hover over the column name that you want to sort to see how it’s sorted.
Click on the column name to sort the queue. For example, clicking Summary will sort your requests in alphabetical order.

Edit multiple issues at the same time
- Go to your service desk project
- Select Queues in the right panel

- Select the target queue from the list via Switch Queues
- Select the tick boxes to select (multiple) issues
Actions will appear that can be applied to all selected issues: Link, Comment, Assign, Watch and Delete.
- Follow below procedures to change multiple requests in bulk.
Add comments to multiple requests at the same time
Rather than add a comment to a request or issue one-by-one, you can comment on many requests at the same time using bulk actions.
To comment on multiple requests:
From your service project, go to a queue that shows all the requests you’d like to comment on.
Click the box beside each request you’d like to comment on.
Click Comment in the action bar.
Enter your text comment.
Click Comment to add the comment to the requests.
You can only add plain text to the comments, attachments cannot be added to multiple requests this way.

Assign multiple requests at the same time
This is only assignment of an issue, no allocation! This can only be done via the workflow.
To assign someone to multiple requests:
From your service project, go to a queue that shows all the requests you’d like to assign.
Select the box beside each request you’d like to assign.
Select Assign in the action bar.
Search and enter the person under Assignee.
Select Assign to assign the person to the requests.
Note: You can only search and assign people in your team.

To Stop/Start Watching multiple requests:
From your service project, go to a queue that shows all the requests you’d like to assign.
Select the box beside each request you’d like to assign.
Select Watch in the action bar.
Select Start watching issues or Stop watching issue.
- Select Confirm.
Watch will only apply for user, you cannot add other watchers to issues via this option, this can only be done in the issue itself.

Delete multiple requests at the same time
To delete multiple requests:
From your service project, go to a queue that shows all the requests you’d like to delete.
Select the box beside each request you’d like to delete.
Select Delete in the action bar.
Select Delete to confirm that you want to delete the requests.
Note: You need the required permissions to delete requests. Deleting a request is irreversible.

Search
There are several search options in Jira which can help if your are looking for an issue.
The first step in searching for issues is to define the criteria for your new search. You can define your search criteria in three different ways: using the quick search, using the basic search, or using the advanced search.
For each of search options the following Syntax for searching text fields can be applied.
Via search results bulk changes can be made, this option should only be used by a Jira Admin. If a bulk update is required a SD request can be submitted including the search URL.
Quick search | The quick search is the fastest way to define search criteria. However, it is less precise than other search methods for complex queries (e.g. To use the quick search: Enter your search criteria in the search box in the header bar of Jira and press Enter.
More detailed information can be found on the following Atlassian page: Quick searching |
|---|---|
Basic search | The basic search is more precise than the quick search, but easier to use than the advanced search. To use the basic search: Navigate to Issues (in header) > Search for issues, then enter your search criteria.
|
Advanced search | The advanced search is the most powerful of the three search methods. You can specify criteria that cannot be defined in the other searches (e.g. To use the advanced search: Navigate to Issues (in header) > Search for issues, then enter your search criteria.
Searching for flagged issuesThe flag for an issue is stored in a custom checkbox field named "Flagged", which has only one value: Impediment. This means that you can use this JQL query to find flagged issues: |

Filters
The Jira Issue search functionality is enhanced by the ability to save searches, called filters in Jira, for later use.
More detailed information how to work with filters can be found on the following Atlassian page: Saving your search as a filter
Please note that a filter can be shared with other users. You can share a filter with:
Project: All members or members with specific project roles working on one or multiple projects.
Group: A group of Jira users.
Open: Any user who is logged-in to your Jira Cloud site.
Public: Public sharing means sharing the dashboard with users who are not logged in to your Jira site. Note that if you share a filter publicly, it will be visible and searchable on the internet.
Private: Only you can view the filter.
Filters can also be used in Dashboards to show a result. Instructions how to do can be found here Editing dashboards.
Export
You can export Jira search results or filter results to excel in two easy steps.
- Create a search selection and click on Search
- Make sure that you have the columns selected that you wish to export:

- Use the Export function.
- Select CSV with current fields

Dashboards
A dashboard is a customizable page that can display many different types of information, depending on your areas of interest. Jira users can create and manage their own dashboards.


A shared dashboard is a dashboard whose creator has shared that dashboard with other users. You can share a dashboard with:
Group: A group of Jira users.
Project: All members or members with specific project roles working on one or multiple projects.
Any logged-in user: Any user who is logged-in to your Jira site.
Public: Public sharing means sharing the dashboard with users who are not logged in to your Jira site. Note that if you share a dashboard publicly, it will be visible and searchable on the internet. See Prevent or remove public access for more information.
When a dashboard is created by a user, that user:
Initially owns the dashboard.
Being the owner, can edit and modify the dashboard.
Viewing dashboards
You can view existing dashboards that have been created by you as owner or shared with your/public,.

- After opening Manage Dashboards select Search at the left column
- User the search/owner field to find a board.
- Select Search button to find a Dashboard.

- Select the
 to add a Dashboard to your favorites list
  .
.
All favorite Dashboards can be opened form your Dashboards view if this is set as your homepage.

In case your Dashboard is not set as homepage this can be changed in your profile settings via:
Click on your Avatar (Main navigation bar at the top Right), Under MY JIRA HOME select Dashboard.
Editing dashboards
You can edit the gadgets displayed on the dashboard or change the dashboard's permissions and owners.
Select the dashboard name. The dashboard will open.
From there, you can:
Edit the settings of every gadget that appears on the dashboard.
Edit the dashboard itself, adding or changing the shares.
- Select Load all gadgets

- Select Filter Results

- Close Gadget screen via X at the right top of the screen.
- Select Saved Filter, If you do not see the the filter in the list, then select Advanced Search below the field.

- Click on “Save” button.

Boards
A board displays your team's work as cards you can move between columns. You can see a team board as the colored glasses through which we look at project data - we can customize a board to show the exact data you want to see.
The data within projects are visible on this board and can be filtered and visualized per team.
In Jira Software, cards and the tasks they represent are called “issues”. Usually, your board reflects your team's process, tracking the status of work as it makes its way through your team's process.
There are two types of boards available:
- Scrum board: for teams that plan their work in sprints.
- Kanban board: for teams that focus on managing and constraining their work-in-progress
Boards can be accessed via the Boards - View all boards in the top Navigation Bar.
All recent opened boards can be found in the Recent Boards list.
Scrum board
On the project sidebar you have the following options: Backlog, Active sprints, or Reports.
The Backlog of a Scrum board shows the issues for your project(s) grouped into a backlog and sprints. In the Scrum backlog, you can create and update issues, drag and drop issues to rank them, or assign them to sprints, epics, or versions, manage epics, and more. You would typically use the Scrum backlog when building a backlog of issues, planning a new version, and planning a sprint.
The Active sprints of a Scrum board displays the issues that your team is currently working on. You can create and update issues, and drag and drop issues to transition them through a workflow.
Reporting is an activity that you will be doing throughout a project. Jira Software has a range of reports that you can use to show information about your project, versions, epics, sprints, and issues.
In the Agile Scrum framework, focus lies on short iterations of work: planning what can be done within (at YME) 2 weeks of time.
- As such, we see an active sprint with items in it (center screen).
- These items are organized into larger topics called Epics (left screen list, but also the colored labels on center screen items).
- When one item is clicked, the details are shown (right screen sidebar).

Kanban board
The Kanban board is a board that was created using the "Kanban" preset .
Kanban is based on the continuous delivery of work. Rather than plan iterations, the flow of work is constantly monitored to ensure that there are always tasks being worked on. This means that when tasks are completed, new tasks are pulled into work-in-progress.
Use the Kanban board if your team focuses on managing and constraining work-in-progress.
On the project sidebar you have the following options: Kanban board, Backlog*, or Reports.
By default, Kanban boards have the Backlog column, where you plan work for your team. Planning work in a small column becomes difficult as more issues are added in the column.
By enabling and using the Kanban backlog, you have a bigger space to create and rank issues, and select issues for your team to start working on
...
The advanced search is the most powerful of the three search methods. You can specify criteria that cannot be defined in the other searches (e.g. ORDER BY clause).
However, you need to know how to construct structured queries using the Jira Query Language (JQL) to use this feature.
To use the advanced search: Navigate to Issues (in header) > Search for issues, then enter your search criteria.
Tip: If the basic search is shown instead of the advanced search, click Advanced next to the ![]() icon.
icon.

Filters
The Jira Issue search functionality is enhanced by the ability to save searches, called filters in Jira, for later use.
More detailed information how to work with filters can be found on the following Atlassian page: Saving your search as a filter
Please note that a filter can be shared with other users. You can share a filter with:
Project: All members or members with specific project roles working on one or multiple projects.
Group: A group of Jira users.
Open: Any user who is logged-in to your Jira Cloud site.
Public: Public sharing means sharing the dashboard with users who are not logged in to your Jira site. Note that if you share a filter publicly, it will be visible and searchable on the internet.
Private: Only you can view the filter.
Filters can also be used in Dashboards to show a result. Instructions how to do can be found here Editing dashboards.
Export
You can export Jira search results or filter results to excel in two easy steps.
...
Queues (Service Management only)
Customer requests are organized into queues. Queues let you quickly view, triage and assign requests as they come in.
They also provide high-level information on an issue; usually a summary, status, and customer name.
There are pre-configured queues and custom queues created by a Jira Admin/Project Admin.
Custom queues allow you to choose the name for the queue, determine what requests are filtered into the queue, and what columns appear in the queue.
Edit an existing queue
...
Sort requests within a queue
From a queue, you can sort your requests based on your columns by clicking the column name.
To sort requests:
From your service project, go to Queues.
Select the queue you want to sort requests in.
Hover over the column name that you want to sort to see how it’s sorted.
Click on the column name to sort the queue. For example, clicking Summary will sort your requests in alphabetical order.
Edit multiple issues at the same time
- Go to your service desk project
- Select Queues in the right panel
- Select the target queue from the list via Switch Queues
- Select the tick boxes to select (multiple) issues
Actions will appear that can be applied to all selected issues: Link, Comment, Assign, Watch and Delete. - Follow below procedures to change multiple requests in bulk.
Add comments to multiple requests at the same time
...
To comment on multiple requests:
From your service project, go to a queue that shows all the requests you’d like to comment on.
Click the box beside each request you’d like to comment on.
Click Comment in the action bar.
Enter your text comment.
Click Comment to add the comment to the requests.
You can only add plain text to the comments, attachments cannot be added to multiple requests this way.
Assign multiple requests at the same time
This is only assignment of an issue, no allocation! This can only be done via the workflow.
To assign someone to multiple requests:
From your service project, go to a queue that shows all the requests you’d like to assign.
Select the box beside each request you’d like to assign.
Select Assign in the action bar.
Search and enter the person under Assignee.
Select Assign to assign the person to the requests.
Note: You can only search and assign people in your team.
To Stop/Start Watching multiple requests:
From your service project, go to a queue that shows all the requests you’d like to assign.
Select the box beside each request you’d like to assign.
Select Watch in the action bar.
Select Start watching issues or Stop watching issue.
- Select Confirm.
Watch will only apply for user, you cannot add other watchers to issues via this option, this can only be done in the issue itself.
Delete multiple requests at the same time
To delete multiple requests:
From your service project, go to a queue that shows all the requests you’d like to delete.
Select the box beside each request you’d like to delete.
Select Delete in the action bar.
Select Delete to confirm that you want to delete the requests.
Note: You need the required permissions to delete requests. Deleting a request is irreversible.
Dashboards
A dashboard is a customizable page that can display many different types of information, depending on your areas of interest. Jira users can create and manage their own dashboards.
A shared dashboard is a dashboard whose creator has shared that dashboard with other users. You can share a dashboard with:
Group: A group of Jira users.
Project: All members or members with specific project roles working on one or multiple projects.
Any logged-in user: Any user who is logged-in to your Jira site.
Public: Public sharing means sharing the dashboard with users who are not logged in to your Jira site. Note that if you share a dashboard publicly, it will be visible and searchable on the internet. See Prevent or remove public access for more information.
When a dashboard is created by a user, that user:
Initially owns the dashboard.
Being the owner, can edit and modify the dashboard.
Viewing dashboards
You can view existing dashboards that have been created by you as owner or shared with your/public,.
...
In case your Dashboard is not set as homepage this can be changed in your profile settings via:
Click on your Avatar (Main navigation bar at the top Right), Under MY JIRA HOME select Dashboard.
Editing dashboards
You can edit the gadgets displayed on the dashboard or change the dashboard's permissions and owners.
Select the dashboard name. The dashboard will open.
From there, you can:
Edit the settings of every gadget that appears on the dashboard.
Edit the dashboard itself, adding or changing the shares.
...
Boards
A board displays your team's work as cards you can move between columns. You can see a team board as the colored glasses through which we look at project data - we can customize a board to show the exact data you want to see.
The data within projects are visible on this board and can be filtered and visualized per team.
In Jira Software, cards and the tasks they represent are called “issues”. Usually, your board reflects your team's process, tracking the status of work as it makes its way through your team's process.
There are two types of boards available:
- Scrum board: for teams that plan their work in sprints.
- Kanban board: for teams that focus on managing and constraining their work-in-progress
Boards can be accessed via the Boards - View all boards in the top Navigation Bar.
All recent opened boards can be found in the Recent Boards list.
Scrum board
On the project sidebar you have the following options: Backlog, Active sprints, or Reports.
The Backlog of a Scrum board shows the issues for your project(s) grouped into a backlog and sprints. In the Scrum backlog, you can create and update issues, drag and drop issues to rank them, or assign them to sprints, epics, or versions, manage epics, and more. You would typically use the Scrum backlog when building a backlog of issues, planning a new version, and planning a sprint.
The Active sprints of a Scrum board displays the issues that your team is currently working on. You can create and update issues, and drag and drop issues to transition them through a workflow.
Reporting is an activity that you will be doing throughout a project. Jira Software has Software has a range of reports that you can use to show information about your project, versions, epics, sprints, and issues.
In the Agile Scrum framework, focus lies on short iterations of work: planning what can be done within (at YME) 2 weeks of time.
- As such, we see an active sprint with items in it (center screen).
- These items are organized into larger topics called Epics (left screen list, but also the colored labels on center screen items).
- When one item is clicked, the details are shown (right screen sidebar).
Kanban board
The Kanban board is a board that was created using the "Kanban" preset .
Kanban is based on the continuous delivery of work. Rather than plan iterations, the flow of work is constantly monitored to ensure that there are always tasks being worked on. This means that when tasks are completed, new tasks are pulled into work-in-progress.
Use the Kanban board if your team focuses on managing and constraining work-in-progress.
On the project sidebar you have the following options: Kanban board, Backlog*, or Reports.
By default, Kanban boards have the Backlog column, where you plan work for your team. Planning work in a small column becomes difficult as more issues are added in the column.
By enabling and using the Kanban backlog, you have a bigger space to create and rank issues, and select issues for your team to start working on.
Reporting is an activity that you will be doing throughout a project. Jira Software has a range of reports that you can use to show information about your project, versions, epics, sprints, and issues.
In the Agile Kanban framework, focus lies on limiting multi-tasking: by choosing fewer items to start, it's possible to complete each more quickly.
- Here we see no epic list on the left.
- In the center we see all items progress through a workflow, with columns turning red if there are too many items in it.
- When clicking one of the item cards, the details are shown on the right hand side.

If you wish to stop your DONE column from overflowing, there are two methods to limit it in time:
Your board admin can make either of these settings for you.
- The "Hide completed issues older than" is easiest to use, but allows limited values.
- The "Kanban board sub-filter" can be used with any query imaginable. The one in the example allows limiting to items X days old.

Board Quick Filters
At the top of a team board you usually find Quick Filters. These are specifically designed for your team board.
By clicking one of these Quick Filters, you narrow the board filter, hiding some or many items to fit the Quick Filter criterion. Deactivate it by clicking it a second time.
It's possible to select multiple Quick Filters, narrowing your selection of items on the board further and further.

Your team board administrator can maintain Quick Filters for you: change them, or add new ones.

Using the issue detail view
Whether you're working on a Scrum or Kanban board, you can click on any issue to view it in more detail.
Displayed Issue details are configured and customizable by your Board Administrator.
- Selected issue.
- Issue detail view.
...
, and issues.
In the Agile Kanban framework, focus lies on limiting multi-tasking: by choosing fewer items to start, it's possible to complete each more quickly.
- Here we see no epic list on the left.
- In the center we see all items progress through a workflow, with columns turning red if there are too many items in it.
- When clicking one of the item cards, the details are shown on the right hand side.
If you wish to stop your DONE column from overflowing, there are two methods to limit it in time:
Your board admin can make either of these settings for you.
- The "Hide completed issues older than" is easiest to use, but allows limited values.
- The "Kanban board sub-filter" can be used with any query imaginable. The one in the example allows limiting to items X days old.
Board Quick Filters
At the top of a team board you usually find Quick Filters. These are specifically designed for your team board.
By clicking one of these Quick Filters, you narrow the board filter, hiding some or many items to fit the Quick Filter criterion. Deactivate it by clicking it a second time.
It's possible to select multiple Quick Filters, narrowing your selection of items on the board further and further.
Your team board administrator can maintain Quick Filters for you: change them, or add new ones.
Using the issue detail view
Whether you're working on a Scrum or Kanban board, you can click on any issue to view it in more detail.
Displayed Issue details are configured and customizable by your Board Administrator.
- Selected issue.
- Issue detail view.

Flagging or unflagging an issue
You can flag an issue to indicate that it's important, set it as impediment.
The card of a flagged issue is displayed in yellow in the Scrum backlog, Active Sprint of a Scrum board , Kanban backlog (if enabled) and, with the 'flag' icon replacing the priority icon.
- Navigate to your desired board.
- Click either Scrum backlog, Active sprints, Kanban backlog (if enabled), or Kanban board.
- Click the issue that you want to flag or unflag.
- In the Issue Detail View, select Add flag or Remove flag from the 'cog' drop-down. You can also right-click on the issue > Add flag or Remove flag.
You can also add a comment when you're adding a flag to or removing a flag from an issue. You may want to do this to indicate your reason for adding or removing the flag.
In the Issue Detail View, select Add flag and comment or Remove flag and add comment from the 'cog' drop-down. You can also right-click on the issue > Add flag and comment or Remove flag and add comment. After adding your comment, it will appear in the Comments section of the issue, with an indication that a flag was added or removed accordingly.
Board configuration
You must be a Jira administrator or a Board administrator for the board to modify its configuration. Any board user is able to view the board configuration.
...
Overview
Content Tools