Page History
...
Use the keyboard command: When viewing a page, press shift and ? together?
Use the main navigation bar: At the top right of your screen, select the ? icon, then Keyboard shortcuts
Scroll to the bottom of any page: In edit mode, scroll to the bottom and select the ? icon
Confluence Editor
The Confluence editor is what you'll use to create and edit Confluence pages, blog posts, and comments. You can enter content as you would in a Word document, apply formatting, and embed other content and files on the page.
...
Macro's
Macros are how you supercharge your Confluence pages.
You can use macros to:
- change the format and layout of your page
- display media like video, audio, and social media content
- collate and organise Confluence pages, blogs, and files
- perform actions from a page, such as creating a page from a template.
Take your Confluence space to the next level using macros.
...
Pages and blogs
Create a page
You can create a page from anywhere in Confluence; just select Create in the header and you're ready to go.
Pages are the place to capture all your important (and unimportant) information; start with a blank page and add rich text, tasks, images, macros and links, or use one of the useful blueprints to capture meeting notes, decisions, and more.
If you want to quickly create a blank page, hit the Create button in the header; if you want to create a page from a template, hit the Create from template button.

- Create blank page
- Create from template

- Select space: choose the space where you'll create the content.
- Page templates: create a page from a template or create other types of content.
- Parent page: your page will be a child of this page.
Once you decide on a blank page or blueprint, you'll be taken straight into the Confluence editor. The editor is where you'll name or rename your page, add the content, and format it to look great.
Move and Reorder Pages
You can also organize pages in a hierarchy, with child and/or parent pages for closely related content.
When you navigate to a Confluence page and select the Create button in the header, the page you're creating will by default be a child of the page you're viewing.
Have as many child pages and levels in the hierarchy as you need to, and move pages or reorder if you want to change their location.
| Warning |
|---|
| Before move or reorder a page be aware of the permissions that are required for this and that you have permissions for both locations to be able to move or reorder a page to a new location. |
| Note |
|---|
All Confluence Space restrictions are set by a Confluence Administrator or a Space admin, preferably by using groups. |
Confluence Editor
The Confluence editor is what you'll use to create and edit Confluence pages, blog posts, and comments. You can enter content as you would in a Word document, apply formatting, and embed other content and files on the page.
Below some editing functionalities are highlighted, for more instructions visit Atlassian site: The Editor
Edit a page
After you save you'll see the page in a “view” mode. You can re-enter the editor any time by selecting Edit or pressing E on your keyboard.
| Note |
|---|
| To edit a page, you need the 'Add Pages' permission for the space. |
To keep track of your changes over time, you can publish the page with a version comment. When you are done editing, enter your comment in the What did you change? field in the lower-left corner of the screen, and then select Save.
![]()
Edit a page together
Need input from your team members? Multiple people can edit your page at the same time.
Hit the Invite button in the editor and either grab the link, or enter some people or groups to invite by email (they need the appropriate Confluence and space permissions of course).
See Collaborative editing for all the ins and outs.
| Warning |
|---|
| Due to performance issues Collaborative Editing in YME Confluence has been turned off. |
Import a Word Document into Confluence
The Office Connector allows you to import Word documents and create one or more Confluence pages from the content.
You can create a single page, or divide the contents up into multiple pages, based on the headings in your document.
This is useful if you have a lot of content stored in existing documents, or if you are migrating from another system or platform that allows you to export to Word format.
Also read information about The View File macro, this allows you to embed an Office or PDF document on a page in view only mode.
To import a Word document in Confluence:
- Create a page in Confluence or go to an existing page (you want to view the page, not edit it).
- Choose
 > Import Word Document
 - Choose Browse and locate the Word document you want to import, then choose Next.
The import document options appear. - Enter a title for the new page (useful if you don't want to use the file name as your page title).
- Choose where you want to import the file (as a brand new page, or overwriting an existing page with the same title).
- Choose how to handle title conflicts (rename the new pages or replace existing pages).
- Choose whether to create a single page or multiple pages based on the heading styles in the file (this option is only available if the file contains heading styles).
- Click Import.
When the upload has finished, pages will be created with the content of the Word documents. You can then view and edit this page as normal. There's no connection between the original Word document and this page.
| Warning |
|---|
| Limitation: In order to prevent out of memory errors, we limit the uncompressed size of the file you can import to 20 MB. |
More more information about Word document import read the following Atlassian page: Import a Word Document into Confluence
Video instructions (Video is in German, but the screenshots are clear).: https://www.youtube.com/watch?v=QUB9lB9EtA
Page comments and inline comments
Add page comments
One way to use comments is to add a comment to an entire page. Here's how:
- Go to the Confluence page you want to comment.
- Scroll to the bottom of the page
- Type a comment in the comment field
- Select Save
When you comment on a page, you will automatically start 'watching' that page. That means you'll receive email notifications when others add comments or changes to the page are made. Your teammates can reply to or 'like' your page comments. If they do, you'll be notified.
Add inline comments
You can also add comments within the page, inline on any text. Inline comments can be added when you are either editing or viewing a page. Here's how to add an inline comment:
- Highlight the text you'd like to comment on
- Click the comment icon that appears above the highlighted text
- Type your comment and select Save
After you save your comment, the text on the page will be highlighted in yellow. To view comments, click any yellow highlighted text on the page. Just like page comments, your teammates can reply to or 'like' your inline comments.
Macro's
Macros are how you supercharge your Confluence pages.
You can use macros to:
- change the format and layout of your page
- display media like video, audio, and social media content
- collate and organize Confluence pages, blogs, and files
- perform actions from a page, such as creating a page from a template.
Take your Confluence space to the next level using macros.
Below you find some useful macro's for Page editing.
Macro basics
Add a macro to your page
To add a macro to your page:
From the editor toolbar, select Insert
 , then Other Macros.
- Select a macro from the list.
- Enter any required parameters.
- Choose Insert.
In the editor you'll see a placeholder that represents the macro. Once you publish your page, you'll see the macro in its full glory.
Edit a macro
Macro parameters are used to change the behavior of a macro.
To change the macro parameters:
- In the editor, click the macro placeholder and select Edit.
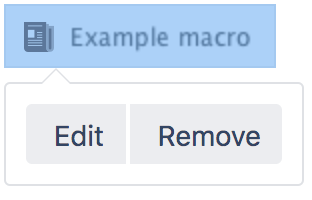
- Update the parameters as required then select Insert.
Head to the documentation for specific macros of Atlassian to view full details of the parameters available in each macro.
Some Macros have been highlighted below:
Macro highlighted
Table of Contents and Content Zone Macro
The Table of Contents macro scans the headings on the current Confluence page to create a table of contents based on those headings or selected zone.
This helps readers find their way around lengthy pages, by summarizing the content structure and providing links to headings.
Step-by-step guide Add Table of Contents:
- From the editor toolbar, choose Insert > Other Macros.
- Choose Table of Contents from the Confluence content category.
- Use the parameters below to specify which pages to display.
- Choose Insert.
You can then publish your page to see the macro in action.
More detailed information regarding Table of contents can be found on the following links:
Children Display Macro
Add the Children Display macro to a page to display a list of pages from a specific part of the page hierarchy. You can choose to display pages that are a child of the current page, or a child of any other page in a space.
This macro is great for providing quick access to:
- pages related to a project
- procedures and how-to pages.
Because it relies on the page hierarchy, the list of pages is automatically updated when pages are added, deleted, or moved. You can even show an excerpt from the page for extra context.
Step-by-step guide: Add the Children Display macro to your page
To add the Children Display macro to a page:
From the editor toolbar, choose Insert
> Other Macros.- Choose Children Display from the Confluence content or Navigation category.
- Use the parameters below to specify which pages to display, and how you want them to look.
- Choose Insert.
You can then publish your page to see the macro in action.
More detailed information regarding Table of Children's Display can be found on the following link: Children Display Macro
Code Block Macro
The Code Block macro is an essential tool for presenting technical content clearly and consistently.
It allows you to display code, configuration snippets, or command-line examples in a way that preserves formatting, improves readability, and prevents accidental formatting changes by Confluence’s rich-text editor.
It will also prevent you from not being able to save a page if a code block is not used for saving code on a page or a page breakage.
Add a Code Block macro to your page to display code examples with syntax highlighting.
This is great for sharing code snippets such as:
- sample code
- terminal commands
- excerpts from application logs.
Add the Code Block macro to your page
To add the Code Block macro to a page:
From the editor toolbar, choose Insert
> Other Macros.- Choose Code Block from the Formatting category.
- Choose a language for syntax highlighting.
- Use the parameters below to customise how the code block should appear on your page.
- Choose Insert.
- Type or paste your code into the macro placeholder.
You can then publish your page to see the macro in action.
More information can be found on the following Atlassian page; Code Block Macro
View File Macro (Embed an Office or PDF document)
The View File macros allow you to embed an Office or PDF document on a page.
First attach the document to a page and then use one of the View File macros to display the document's content.
- Create a page in Confluence or go to an existing page (you want to view the page, not edit it)
- Go to Insert > Files and images and upload a file or drag the file directly onto the page
You can attach multiple files at a time. - Save the page by selecting the Publish button
- Open the page again and select Edit mode
- Remove the file
- From the editor toolbar, choose Insert
 > Other Macros
 - Select the format of the file (Office Word, Office Excel, Office Powerpoint, PDF etc)
The recently uploaded file will be selected automatically. - Select Insert
- Save the page by using the Update button
When opening the page in viewing mode you can now see the content of the page. For editing the file must be downloaded and can be saved to upload the latest version.
Supported file types
To display an Office or PDF document in a page, use one of the following View File macros in the macro browser:
- Office Excel (.
xlsand .xlsx) - Office PowerPoint (.
pptand .pptx) - Office Word (.
docand .docx) - PDF (
.pdf)
Macro basics
Add a macro to your page
To add a macro to your page:
From the editor toolbar, select Insert
, then Other Macros.- Select a macro from the list.
- Enter any required parameters.
- Choose Insert.
In the editor you'll see a placeholder that represents the macro. Once you publish your page, you'll see the macro in its full glory.
Edit a macro
Macro parameters are used to change the behavior of a macro.
To change the macro parameters:
- In the editor, click the macro placeholder and select Edit.
- Update the parameters as required then select Insert.
Head to the documentation for specific macros of Atlassian to view full details of the parameters available in each macro.
Some Macros have been highlighted below:
Macro highlighted
Table of Contents and Content Zone Macro
The Table of Contents macro scans the headings on the current Confluence page to create a table of contents based on those headings or selected zone.
This helps readers find their way around lengthy pages, by summarizing the content structure and providing links to headings.
Step-by-step guide Add Table of Contents:
- From the editor toolbar, choose Insert > Other Macros.
- Choose Table of Contents from the Confluence content category.
- Use the parameters below to specify which pages to display.
- Choose Insert.
You can then publish your page to see the macro in action.
More detailed information regarding Table of contents can be found on the following links:
Children Display Macro
Add the Children Display macro to a page to display a list of pages from a specific part of the page hierarchy. You can choose to display pages that are a child of the current page, or a child of any other page in a space.
This macro is great for providing quick access to:
- pages related to a project
- procedures and how-to pages.
Because it relies on the page hierarchy, the list of pages is automatically updated when pages are added, deleted, or moved. You can even show an excerpt from the page for extra context.
Step-by-step guide: Add the Children Display macro to your page
To add the Children Display macro to a page:
From the editor toolbar, choose Insert
> Other Macros.- Choose Children Display from the Confluence content or Navigation category.
- Use the parameters below to specify which pages to display, and how you want them to look.
- Choose Insert.
You can then publish your page to see the macro in action.
More detailed information regarding Table of Children's Display can be found on the following link: Children Display Macro
Code Block Macro
The Code Block macro is an essential tool for presenting technical content clearly and consistently.
It allows you to display code, configuration snippets, or command-line examples in a way that preserves formatting, improves readability, and prevents accidental formatting changes by Confluence’s rich-text editor.
It will also prevent you from not being able to save a page if a code block is not used for saving code on a page or a page breakage.
Add a Code Block macro to your page to display code examples with syntax highlighting.
This is great for sharing code snippets such as:
- sample code
- terminal commands
- excerpts from application logs.
Add the Code Block macro to your page
To add the Code Block macro to a page:
From the editor toolbar, choose Insert
> Other Macros.- Choose Code Block from the Formatting category.
- Choose a language for syntax highlighting.
- Use the parameters below to customise how the code block should appear on your page.
- Choose Insert.
- Type or paste your code into the macro placeholder.
You can then publish your page to see the macro in action.
More information can be found on the following Atlassian page; Code Block Macro
Apps
Draw IO
Draw.io addon for Confluence is used to create powerful, easy to use and secure diagrams and whiteboards.
...
Overview
Content Tools