Page History
Table of Contents
| Expand | ||||
|---|---|---|---|---|
|
| Livesearch | ||||||
|---|---|---|---|---|---|---|
|
Introduction
Welcome to the Confluence Basic Training page, designed to help you quickly get up to speed with Confluence Data Center Environment.
Confluence is a collaboration wiki tool used to help teams to collaborate and share knowledge efficiently. Dynamic pages gives a team a place to create, capture, and collaborate on any project or idea.
...
Whether you’re a new contributor, a space administrator, or part of a team, this training reference will help you work productively and maintain the quality and consistency of our knowledge base.
| Info |
|---|
| Looking for more training material? Visit the Atlassian Confluence Data Center documentation. |
Confluence access, permissions and restrictions
...
Use the site navigation menu to find people, pages, and apps no matter where you are in your Confluence site: 
![]()
- Tap Home or the Confluence logo ( ) to return to your Confluence dashboard. Tap Recent to see a list of pages and blog posts you’ve visited or worked on, plus drafts and starred content.
- Tap Spaces to move between your starred or recently visited spaces, or to access the space directory.
- Tap People to visit the people directory, where you can find information about the people you work with and create teams.
- Tap Apps to see a list of the apps that are installed on your site or visit an app’s dashboard.
- Tap Create to create a new page from anywhere on your site.
...
More more information about Word document import read the following Atlassian page: Import a Word Document into Confluence
Video instructions (Video is in German, but the screenshots are clear).: https://www.youtube.com/watch?v=QUB9lB9EtA
Page comments and inline comments
...
After you save your comment, the text on the page will be highlighted in yellow. To view comments, click any yellow highlighted text on the page. Just like page comments, your teammates can reply to or 'like' your inline comments.
Macro's
...
Links
You can use macros to:
- change the format and layout of your page
- display media like video, audio, and social media content
- collate and organize Confluence pages, blogs, and files
- perform actions from a page, such as creating a page from a template.
Take your Confluence space to the next level using macros.
...
create links to pages, blog posts, anchors, attachments, external websites, Jira issues and more. Links can be text or images, and can be added in many different ways.
Links to pages within your Confluence site are relative, which means that you can move pages and rename pages without breaking links.
Below paragraph explains the most common ways to create links.
Insert a Jira issue/filter link
To create an association between a Jira issue and a Confluence page use the Jira issue/filter option, read Jira Issues Macro for instructions.
Insert a text link
To insert a link on a page:
- In the editor, select some text or position your cursor where you want to insert the link.
- Select Link on the toolbar or use the keyboard shortcut Ctrl+K.
- Select a page, blog post or attachment, or enter an external URL (see below for how to link to particular types of content).
- Enter or modify the link text (this is the text that will appear on the page. If this field is left blank, the page name or URL will be used as the link text.)
- Select Insert.
Insert an image link
- Select an image on your page.
- Select Link on the Image Properties toolbar.
- Select a page, blog post or attachment, or enter an external URL (see below for how to link to particular types of content).
- Select Insert.

Modify a link
- Select the link text or image.
- Select Edit from the link properties toolbar.
- Modify the link and select Save.
Remove a link
- Select the link text or image.
- Select Unlink from the properties toolbar.

Link to specific types of content
Confluence supports many methods like below for creating links, for more detailed documentations read the following Atlassian page: Links
- Link to a page
- Link a page in another space
- Link to a blog post
- Link to an attachment or image on this page
- Link to an attachment on another page
- Link to an external website
- Link to an anchor on a page
- Link to a heading on a page
- Link to a comment on a page
- Link to an undefined page (a page that does not exist yet)
- Link to a personal space or user profile
Tables
With Confluence tables you can use the familiar table formatting options like resizing columns, coloring cells, rows and columns, aligning content, and table sorting by clicking the column headers to view the information the way you like it.
Insert a table
To create a table:
- Hit the Table button in the toolbar
- Click a cell in the drop-down to set the number of columns and rows in your table

Edit your table
To resize table columns, just click and drag the column's border. To make other changes to your table, click inside it to reveal the table toolbar.
Here's a summary of the table tools:
| Column width modes
|
| Rows
|
| Columns
|
| Cells
|
| Alignment
|
| Table
|

Sort the table
You can sort the contents of your table by selecting the sort icon in the table header row.
To preserve the order of a sorted table:
Edit a page
Go to the table, and select the sort icon for the column you want to sort
Select Publish to save the changes
Screenshot: A colorful, sortable table

You can use the Cut row and Paste row icons to move rows around in the editor.
For more information about Tables read Atlassian page: Tables
Tasks
Keep track of the things that need to get done with tasks. With the ability to give each task an assignee and due date, and plenty of ways to see your tasks, you can make sure nothing slips through the cracks.
Add a task
You can add tasks on any page in Confluence. For example, you might add tasks under action items on a meeting notes page, or in a requirements page – anywhere you need a lightweight task management solution.
To create a task:
- In the editor, choose the Task list
 button or use the keyboard shortcut [ ]
 - Start typing your task – @mention someone to assign the task to them, and type // and choose a due date
The first person you mention in a task is the assignee; you can even assign tasks to yourself.
| Note |
|---|
|
View tasks
There are a number of ways to keep track of tasks assigned to you, or tasks you've created for others.
Basics for tasks are explained below for more information read the following Atlassian page: Add, Assign and View Tasks.
View tasks on a page

View tasks in your profile
Go to Profile > Tasks.
Use the filters to show tasks that were assigned to you or created by you in the last 6 months, and toggle between complete or incomplete tasks.

View in a task report
Create a task report:
- Choose Create > Task Report
- Select the type of report:
- Assigned to my team – for tasks assigned to particular people.
- In my project – for tasks that appear in a specific space or parent page.
- Custom – for a wide range of filtering options, including by date or page label.
- Follow the prompts to create the report.
This blueprint uses the Task Report Macro. You can also choose to use this macro on an existing page, for example, on a project or team space homepage.

Labels
Labels are key words or tags that you can add to pages, blog posts and attachments. You can define your own labels and use them to categorize, identify or bookmark content in Confluence.
For example, you could assign the label 'accounting' to all accounts-related pages on your site. You can then browse all pages with that label in a single space or across the site, display a list of pages with that label, or search based on the label.
Because labels are user-defined, you can add any word that helps you identify the content in your site.
Below the basics for label usage is explained, if you want to know more read the following Atlassian page: Add, Remove and Search for Labels and Display Pages with Label Macros.
Label a page or blog post
Any user with permission to edit a page can add labels to it. Any existing labels appear at the bottom-right of the page, below the page content.
To add a label to a page or blog post:
- At the bottom of the page, choose Edit labels
 or hit L on your keyboard
 - Type in a new label (existing labels are suggested as you type)
- Choose Add

If you're editing or creating a page, and you want to add labels, choose the Edit label icon ![]() at the top of the page.
at the top of the page.
Search by label
You can use the ' labelText: ' prefix to search specifically for content that has a specific label. For example, if you're looking for pages with the label 'chocolate', type labelText:chocolate into the search field in the Confluence header.
For more examples of searching by label, see Confluence Search Syntax.
Macro's
Macros are how you supercharge your Confluence pages.
You can use macros to:
- change the format and layout of your page
- display media like video, audio, and social media content
- collate and organize Confluence pages, blogs, and files
- perform actions from a page, such as creating a page from a template.
Take your Confluence space to the next level using macros.
Basics information and some highlighted Macros are explained below.
Head to the documentation for specific macros information of Atlassian to view full details of the parameters available in each macro.
Macro basics
Add a macro to your page
To add a macro to your page:
From the editor toolbar, select Insert
 , then Other Macros.
- Select a macro from the list.
- Enter any required parameters.
- Choose Insert.
In the editor you'll see a placeholder that represents the macro. Once you publish your page, you'll see the macro in its full glory.
Edit a macro
Macro parameters are used to change the behavior of a macro.
To change the macro parameters:
- In the editor, click the macro placeholder and select Edit.
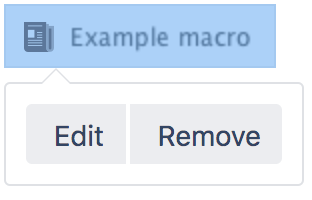
- Update the parameters as required then select Insert.
Macro's highlighted
Jira Issues Macro
Issue linking also allows you to:
- create an association between a Jira issue and a Confluence page
- link a Jira issue to any other web page
When you link Jira issues together, you create a bi-directional connection between them
From the editor toolbar, select Insert
, then Other Macros.- Choose Jira Issue/Filter from the category.

- Enter a filter or search for a Jira issue.
- Choose Insert.
For more information read the following Atlassian page: Jira Issues Macro
Macro basics
Add a macro to your page
To add a macro to your page:
From the editor toolbar, select Insert
, then Other Macros.- Select a macro from the list.
- Enter any required parameters.
- Choose Insert.
In the editor you'll see a placeholder that represents the macro. Once you publish your page, you'll see the macro in its full glory.
Edit a macro
Macro parameters are used to change the behavior of a macro.
To change the macro parameters:
- In the editor, click the macro placeholder and select Edit.
- Update the parameters as required then select Insert.
Head to the documentation for specific macros of Atlassian to view full details of the parameters available in each macro.
Some Macros have been highlighted below:
...
Table of Contents and Content Zone Macro
The Table of Contents macro scans the headings on the current Confluence page to create a table of contents based on those headings or selected zone.
This helps readers find their way around lengthy pages, by summarizing the content structure and providing links to headings.
Headings can be found at left side in the upper bar.
Step-by-step guide Add Table of Contents:
...
More detailed information regarding Table of contents content macro's can be found on the following links:
...
Main navigation bar
The main navigation bar is the menu at the top of your screen that stays with you wherever you go in Confluence.
![]()
![]()
The options within your navigation bars may look different than the screenshot. Navigation options can be customized based on your space settings, permissions, and team preferences.
...
You can 'watch' pages to get email notifications when changes or comments are added to the page.
Share pages with teammates![]()
...
Overview
Content Tools