THIS PAGE IS UNDER CONSTRUCTION |

Introduction
Never worked with Jira before? No problem. Please first read the Jira training Basics page.
This chapter is part of is part Jira training for Information Systems, below the Jira setup for Information Systems - Yamaha Applications Support Desk (SD) Onboarding procedure is explained.
This procedure is used by IT Servicedesk.
All Onboarding requests will be processed via Recruitment and HR.
HR is responsible for creating the actual ticket for the IT Servicedesk.
Portal instructions how to fill the onboarding form can be found on the following page: Onboarding process.
Onboarding Flow

Workflows
SD: Access Request Onboarding Workflow
This workflow is used by Issue type Onboarding for the original onboarding request.
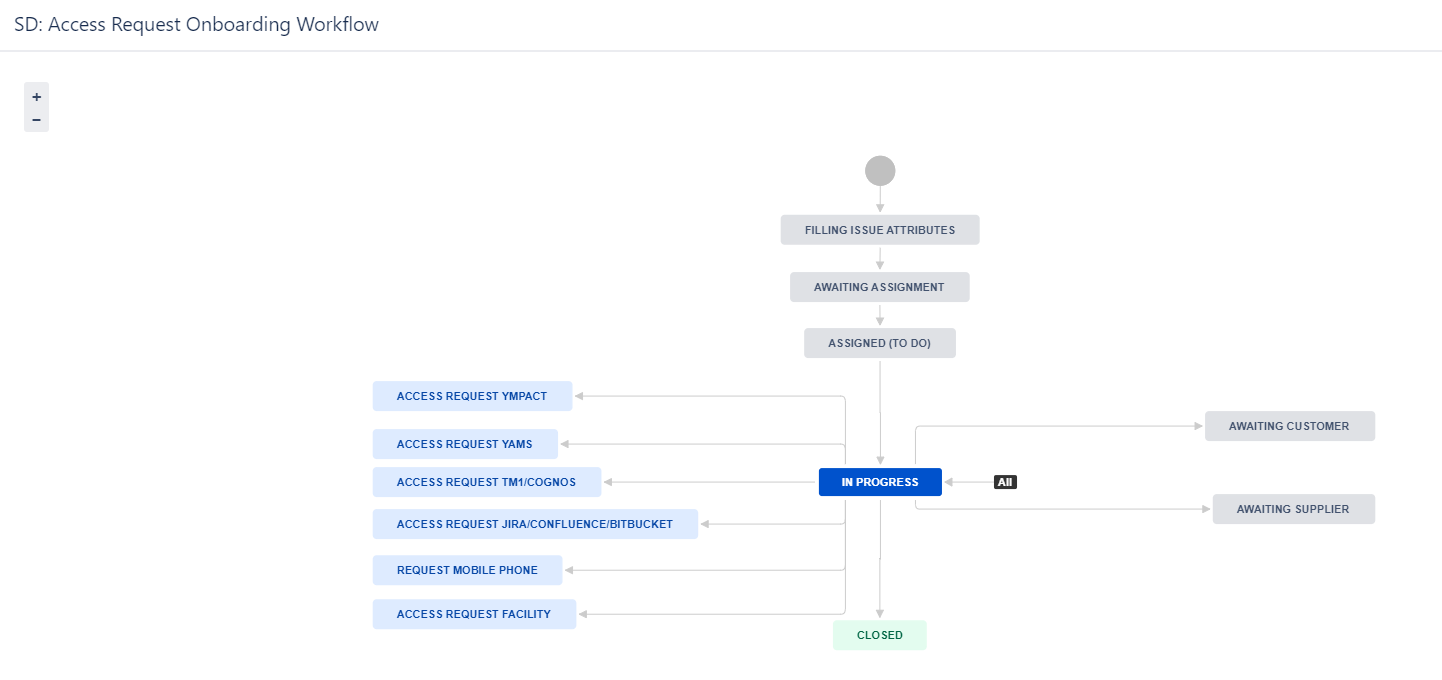
Statuses SD: Access Request Onboarding Workflow
- Filling Issue attributes:Ticket is created, automation rules are running at the background to fill issue field values.
- Awaiting assignment Onboarding ticket ready for being picked up by IT Servicedesk; Assign ticket to a SD-Agent
- Assigned (to do) work has not started, Onboarding issue has been assigned to a SD-Agent
- In Progress Issue is in Progress (work can always move back to this status);
- Awaiting Customer Used when more information/response from a customer (Reporter or Requested participant) is required in order to move forward with a issue.
Detailed information for this status can be found further below under: Jira training for Onboarding
- Awaiting Supplier Used when more information/response from a supplier is required.
Detailed information for this status can be found further below under: Jira training for Onboarding - Access request Ympact Triggers automatic Sub-Task creation
- Access request Yams Triggers automatic Sub-Task creation
- Access request TM1/Cognos Triggers automatic Sub-Task creation
- Access request Jira/Confluence/Bitbucket Triggers automatic Task creation
- Request Mobile Phone: Triggers automatic Sub-Task creation
- Access Request Facility : Triggers automatic Task creation
- Closed Onboarding of the new employee/user has been completed
Awaiting Customer status 
The Awaiting Customer status is used when more information/response from a customer (Reporter or Requested participant) is required in order to move forward with a issue.
Please also read page How to use @mentions to tag a reporter or a commenter directly.
- Awaiting Customer status can be triggered via the Respond to customer button .
 - Onboarding > image-2023-3-29_19-38-28.png")
When selecting this option a pop up frame will be opened:
 - Onboarding > image-2023-3-29_19-41-37.png")
- Check Comment selection (see marked in red in the above screenshot).
Default for comment is set to Internal comment. The Internal comment option can be used for only triggering a status update to Awaiting customer.
Use comment: Respond to customer if your message should be shared with the the reporter and requested participants. - Optional: Add comment to the comment section.
- Select the Respond to customer button.
- After using the Respond to customer button is pressed the comment will be added to the ticket and status will be changed to Awaiting customer. Description area is optional.
 - Onboarding > image-2023-3-27_11-47-49.png")
- Response from customer received:
- Via issue: Status will automatically changed back to status In Progress.
- Manually: Select status In Progress.
 - Onboarding > image-2023-3-29_19-43-0.png")
Awaiting supplier status 
The Awaiting Supplier status is used when a supplier has been contacted either via the issue directly or via other communication canals to purchase/request assistance for products/services.
Please also read page How to use @mentions to tag a reporter or a commenter directly.
- Awaiting Supplier status can be triggered via the Awaiting Supplier button .
 - Onboarding > image-2023-3-29_19-38-44.png")
When selecting this option a pop up frame will be opened:
 - Onboarding > image-2023-3-29_19-40-7.png")
- Check Comment selection (see marked in red in the above screenshot).
Default for comment is set to Internal comment. The Internal comment option can be used for only triggering a status update to Awaiting Supplier
Use comment: Respond to customer if your message should be shared with the the reporter and requested participants. - Optional: Add comment to the comment section.
- Select the Awaiting supplier response button.
- After reply from the Awaiting supplier response button is pressed the comment will be added to the ticket and status will be changed to Awaiting Supplier. Description area is optional.
 - Onboarding > image-2023-3-27_11-59-41.png")
- Response from supplier received:
- Via issue: Status will automatically changed back to status In Progress.
- Manually: Select status In Progress.
 - Onboarding > image-2023-3-29_19-43-40.png")
SD: Simple 3 step Workflow
This workflow is used by Issue type Task and Subtask.
Tasks and Sub-Tasks are triggered via the Access request workflow transitions in the SD: Access Request Onboarding Workflow
 - Onboarding > image2023-3-2_12-28-19.png")
Statuses SD: Simple 3 Step workflow
- To do: work has not started, issue can be assigned (work can always move back to this status);
- In progress: Issue is in Progress (work can always move back to this status);
- Done: the work is completed, resolution is automatically set to "Done";
- Canceled: No further work will be done on this issue, it is not required anymore or has become obsolete. Resolution is automatically set to "Canceled" a comment Screen will pop up to include information why the issue has been canceled (can be selected from any status).
If a Issue is already closed and will be moved back to status "To Do" or "In Progress" the resolution will be cleared.
Onboarding procedure in Jira
- Onboarding ticket is created by HR, reporter = HR-Jira@yamaha-motor.eu [YME HR]
- After creation ticket will be transitioned to status Awaiting assignment
- SD-agent allocates ticket via
 - Onboarding > image2023-3-2_11-6-9.png") button to him/herself
button to him/herself - SD-agent set issue to
 - Onboarding > image2023-3-2_11-6-48.png")
After transitioning the Onboarding ticket to status In Progress the Onboarding form will automatically being attached.
Please make sure you have the Forms tab open to view the form
 - Onboarding > image2023-3-2_11-4-32.png")
 - Onboarding > image2023-3-2_11-3-30.png")
The form is directly visible in the customer portal.
- SD-agent adds Manager of the new user as Requested participant
- Add in the comment section a canned response "SD_Onboarding NEW" and adjust the information between brackets[ ]
- Then click on Share with Customer to send the message.
 - Onboarding > image-2023-3-29_18-44-24.png")
 - Onboarding > image-2023-3-29_18-44-41.png")
- Manager receives a notification via e-mail.
For the manager it will look like below in the Customer portal:
 - Onboarding > image-2023-3-29_18-50-31.png")
- Manager action:
- Manager saves and submit form in customer portal
 - Onboarding > image2023-3-2_11-56-10.png")
The form will be locked for editing. Print screen from original onboarding ticket
 - Onboarding > image2023-3-2_11-56-39.png")
- Form will be attached as PDF. This PDF file is not visible in the customer portal, only in the original ticket for SD-agents.
 - Onboarding > image2023-3-2_11-57-12.png")
- Sub-task and Jira training for Onboarding can be requested according to selection made in the Onboarding Form.
- After all linked Sub-task and tasks are completed the Onboarding ticket can be closed by the SD-Agent.
- Use a canned response:
Sub-Tasks - Onboarding > image2023-3-2_11-38-39.png")

For internal action by IT department(s) a Sub-Task can be created via the original Onboarding ticket. This is automatically done by selecting the appropriate transition.
Status: Transition:
 - Onboarding > image-2023-3-29_18-54-25.png")
Transitions are visible in the Onboarding ticket via the (workflow)buttons
 - Onboarding > image2023-3-2_11-30-35.png")
After a Subtask transition is triggered in the original Onboarding ticket the status is changed to Access request XXXXXXX
 - Onboarding > image2023-3-2_19-48-26.png")
After the Sub-Task creation the original SD ticket automatically transitions back to In Progress  - Onboarding > image2023-3-2_11-14-44.png")
These status changes are also visible in the Customer Portal:
Example:
 - Onboarding > image2023-3-2_19-48-41.png")
This status change also reflects in the customer portal:
Example:
 - Onboarding > image2023-3-2_19-48-49.png")
All requested Sub-Tasks can be found under Sub-Tasks section in the original Onboarding ticket
 - Onboarding > image2023-3-2_11-25-28.png")
Status of Sub-Task can easily being tracked in original Onboarding ticket.
If a Sub-Task is completed it will look as follows in the original ticket.
 - Onboarding > image2023-3-2_12-19-40.png")
Sub-Task procedure
- Status To Do: SD-Agent assigns ticket to himself/herself
- Requested action is being executed by selected Yamaha team
- Request is closed, comment screen will pop up for final comment
- Approval: add approved/not approved comment
- Execution granting rights or Ympact : add screenshots for evidence collection J-sox, see .......
No action needed, select canceled and provide reason for cancelation.
A Sub-Task ticket is a internal task which is not visible in the Customer portal. For this reason there is no match with the (customer) request type in the customer portal.
 - Onboarding > image2023-3-2_11-27-4.png")
Onboarding Ympact - Req. Ympact
- Select Internal comment
- Type comment: Ympact: copy [ example user ]to [ New user]
- Select Req. Ympact
 - Onboarding > image2023-3-2_11-13-41.png")
Status of Onboarding ticket temporary changes to  - Onboarding > image2023-3-2_11-14-15.png") After ticket is created it will automatically transitions back to
After ticket is created it will automatically transitions back to
This option triggers a subtask
All attachments and onboarding form from original ticket are copied to the subtask:
Onboarding Yams- Req. Yams
- Select Internal comment
- Type comment: Ympact: copy [ example user ]to [ New user]
- Select Req. Yams
Status of Onboarding ticket temporary changes to  - Onboarding > image2023-3-2_18-3-50.png") After ticket is created it will automatically transitions back to
After ticket is created it will automatically transitions back to
This option triggers a subtask
 - Onboarding > image2023-3-2_18-5-48.png")
All attachments and onboarding form from original ticket are copied to the subtask:
New ticket is visible in Infra-AS400 Dashboard
 - Onboarding > image2023-3-2_18-12-2.png")
Subtask Yams
Automatically set:
Solution group: Infrastructure
Yamaha Team: INFRA-AS400
Description:
[ issue last comment from original Onboarding ticket ]
Please create a ODBC connection for new YAMS user.
When done change the following fields to:
- Solution group: Business Applications (ITS Support)
- Yamaha team: B2B-YAMS
- Assignee: Remon Cliteur
Dear Remon,
Please grand Yams authorization for new user.
Added directly from last comment original Onboarding ticket
Ympact: YMETST to YMETSTNEW1
 - Onboarding > image2023-3-2_12-22-26.png")
 - Onboarding > image2023-3-2_12-27-0.png")
Task  - Onboarding > image2023-3-2_13-33-17.png")

For non-internal action by divisions/departments other than Information Systems or for Scrum teams a Task can be created via the original Onboarding ticket. This is automatically done by selecting the appropriate transition.
Status: Transition:
 - Onboarding > image-2023-3-29_18-55-28.png")
Transitions are visible in the Onboarding ticket via the Workflow menu
 - Onboarding > image-2023-3-29_18-56-24.png")
After a Task transition is triggered in the original Onboarding ticket the status is temporary changed to status Access request XXXXXXX
This status change is visible in the Customer Portal:
 - Onboarding > image-2023-3-29_18-58-53.png")
 - Onboarding > image-2023-3-29_18-59-9.png")
After the Task creation the original SD ticket automatically transitions back to In Progress.
This status change also reflects in the customer portal:
Example:
 - Onboarding > image-2023-3-29_18-59-42.png")
All requested Tasks can be found under Issue Links section in the original Onboarding ticket
 - Onboarding > image2023-3-2_13-18-57.png")
 - Onboarding > image-2023-3-29_19-1-28.png")
Task workflow and procedure
Statuses SD: Simple 3 Step workflow
- To do: work has not started, issue can be assigned (work can always move back to this status);
- In progress: Issue is in Progress (work can always move back to this status);
- Done: the work is completed, resolution is automatically set to "Done";
- Canceled: No further work will be done on this issue, it is not required anymore or has become obsolete. Resolution is automatically set to "Canceled" a comment Screen will pop up to include information why the issue has been canceled (can be selected from any status).
If a Issue is already closed and will be moved back to status "To Do" or "In Progress" the resolution will be cleared.
Task Facility
- Task is created
- Automatically Assignee is set, same assignee of Original Onboarding ticket.
- Description is automatically added
 - Onboarding > image2023-3-2_13-43-59.png")
Task is also visible in the Customer portal
 - Onboarding > image2023-3-2_13-26-17.png")
 - Onboarding > image2023-3-2_13-28-34.png")
The following section is for Facility & Reception:
 - Onboarding > image2023-3-2_13-31-1.png")
- Facility/Receptions executes task as requested in Onboarding form
- Facility/Reception informs via comment in customer portal what action has been taken: Provided Batch, Keys, Desk
After adding comment select Add
 - Onboarding > image2023-3-2_13-32-24.png")
- Assignee receives comment notification via e-mail
- If all required actions are performed Task can be closed.
- Assignee select Done to close the ticket
 - Onboarding > image2023-3-2_13-34-50.png")
- Assignee adds comment for share with customer to confirm to Facility/Reception that task will be closed.
No action needed, select Canceled and provide reason for cancelation.
Task Jira/Confluence/Bitbucket
- Task is created
- Automatically following fields are set:
- Solution Group: Infrastructure
- Yamaha Team: JIRA-APPS
- Sprint: Active Sprint
- Story Points: 1
- Request type No match
- Assignee: Bianca van der Meer
- Description is automatically added
 - Onboarding > image-2023-3-29_19-7-8.png")
Task is not visible in the Customer portal
 - Onboarding > image-2023-3-29_19-8-35.png")
- Jira Admin changes status from "To Do" to "In Progress"
 - Onboarding > image-2023-3-29_19-12-28.png")
- Jira Admin executes task as requested in Onboarding form
For AD user: Please inform approved groups to be assigned in AD.
and leave status to In Progress.
Servicedesk can assign approved rights and close the ticket.
For non-AD user: Please create/adjust a Jira internal directory account.
Add user as requested participant.
Ticket can be closed after granting access.
- Assignee of Original onboarding ticket can see status update in the original ticket.
- If all required actions are performed Task can be closed.
- Assignee select Done to close the ticket
 - Onboarding > image-2023-3-29_19-13-56.png")
- No action needed, select Canceled and provide reason for cancelation.
 - Onboarding > image-2023-3-29_19-14-31.png")
Onboarding Form
The Onboarding form has been setup in Pro Forma Forms. If it is not working properly please reach out to Bregje Mank, Daan Libeton, Jira administrator.
A open form always needs to be saved and submitted.
After Save and Submit or pressing Submit button in the form a Confirm screen will pop up.
Select Submit to finalize the Onboarding Form.
 - Onboarding > image2023-3-2_11-55-22.png")
Automatically the form is being attached to the Ticket.
Form will also being attached as PDF. This PDF file is not visible in the customer portal, only in the original ticket for SD-agents.
Re-open locked form
If needed form can be re-opened by SD-agents.
- Select Reopen
 - Onboarding > image2023-3-2_12-3-8.png")
- Confirm Reopen
 - Onboarding > image2023-3-2_12-3-23.png")
- Form can be adjusted by reporter and requested participants or by SD-agent.
- Save changes by pressing submit
 - Onboarding > image2023-3-2_12-4-49.png")
- Confirm submit
- A new PDF file will be attached with the form. See date/time stamp for form version. This PDF file is not visible in the customer portal.
 - Onboarding > image2023-3-2_12-15-12.png")