THIS PAGE IS UNDER CONSTRUCTION
Table of Contents
Introduction
Never worked with Jira before? No problem. Please first read the Jira training Basics page.
In this chapter below the Jira setup for Information Systems - Yamaha Applications Support Desk (SD) is explained.
Yamaha Applications Support Desk (SD)
In Yamaha Applications Support Desk all operational support (BAU- Business As Usual) requests are registered that relates to IT Application Issues/errors for existing functionality, data correction and authorization requests.
Users can create a new issue via the Yamaha Motor Europe support portal, via this portal you can go to the YME Information Systems Support Portal to submit a IT request.
Instructions of the portal forms can be found here: YME Information Systems Support Portal Guide
The  button should NOT be used for creation of a SD issue.
SD Issuetypes
 Incident: Reporting a incident or outage. Currently all incoming issues submitted via the Jira Customer portal will have Issue type Incident.
 Service Request: Request for information. (This issue type is currently not used anymore)
 Audit: Used for J-sox change requests and IRY issues registered to deliver evidence for auditors.
 Authorization request: Elevate user rights request used for Ympact to request YMXXITS1 access to have command line access and to operate in Ympact (Branch specific) Production environment.
 RobotJob Change: Robot Job Change request used for Ympact Job scheduling
 Deployment request: Triggered by Development software projects used by B2B teams for Ympact,Ympulse, Yamcom deployments.
![]() Onboarding Issue type used for Onboarding new Users
Onboarding Issue type used for Onboarding new Users
![]() Task
Task
![]() Sub-task
Sub-task
SD Issues overview
SD Specific Fields
SD mandatory fields have been highlighted in Yellow

- Type: Issue type
- Priority: By default issues are set to Medium

- Solution group *: Drop down single select list to define which department will be working on the issue.

- Team Yamaha: Label field, multi select, always starting with team# <team name>. This field is only automatically field for Special processes like SQL Execution, Robot Job Changes.
This field has been replaced with Yamaha Team.
- Yamaha Team*: Mandatory Drop down single select list to define which (agile) team will be working on the issue.

- Application-Module*: Mandatory Drop down single select list to indicate the involved Application-Module of the reported request (issue).
- Department: Department of the reporter of the issue.
- Company: Company of the reporter of the issue.
- Epic Link: Linked epic issue if a issue is related to a Project.
- SD Classification: Drop down single select list, by default for incoming issues it is set to Business as Usual (BAU)

- Story Points: used to estimate (in a Fibonacci range) the complexity, effort, and risk inherent to the story. Story Points field available for issue type Change request, Task, Story, Bug, Defect, Spike.
- Business value: used to estimate (in a Fibonacci range) the value of that piece of development to the YME business.
- Sprint: Multi select field to link the issue to a sprint.
- Ticket groups: Checkbox field used to group stories and bugs under a YPM Programme/Project.

- Resolution: Resolution can be set when a issue will be closed.
* Combination of Solution group and Yamaha Team determines in which queue/board a issue is visible for non-agile teams.
For Agile teams only Yamaha team field determines in which board the issue is visible.

- Request Type: Customer portal request type
- Customer status: Status visible in the Customer portal. This does not always corresponds directly with the issue workflow status.
- Channel: Portal or e-mail request
- View customer request: link directly to the Customer portal request. This link can be shared if a customer need to access a specific issue.
SD Workflow(s)

SD Default Workflow

Statuses
1. Filling user attributes first status for incoming tickets. Background process is running to collect user data and fill other fields automatically. No action should be taken when a ticket has this status.
The ticket will automatically move to next status Awaiting assignment.
2. Awaiting assignment Ticket can be assigned, this need to be done via the Allocate button.
For all other statuses the Assignee field can be used directly to re-assign a ticket to yourself or a colleague (instructions below).
3. Assigned to do Ticket is automatically transferred to this status after using the allocate button. Ticket will appear on to do list of a assignee (Filter number 4 in the dashboard)
4. In Progress When starting to work on a ticket use the Start progress button
4. Closed The issue is considered finished, the resolution is correct. Issues which are closed can be reopened.
5. Reopened Re-open issue. Issue need to be re-assigned to a assignee and will be transitioned to status In Progress.
Other statuses:
Awaiting Customer Used when more information/response from a customer (Reporter or Requested participant) is required in order to move forward with a issue.
Awaiting Supplier Used when more information/response from a supplier is required.
Awaiting Authorization Used to request approval for Ympact authorization.
SD Classification need to be on : User authorization related
Onboarding
Pending linked ticket execution
Change Advisoryboard (CAB)
Awaiting Development
Awaiting Execution
Deployment validation
Ready to Close
Review Approval Used by Infra for Issue type Audit to have J-sox change reviewed. How-to create an Infra J-SOX CHANGE issue
Awaiting manager approval Used by Infra to request IT management approval for J-sox changes. How-to create an Infra J-SOX CHANGE issue
If a (bug) fix for a application is required the Bugfix transition can be used to trigger a issue being created in a Development project.
SD: Software Authorization flow

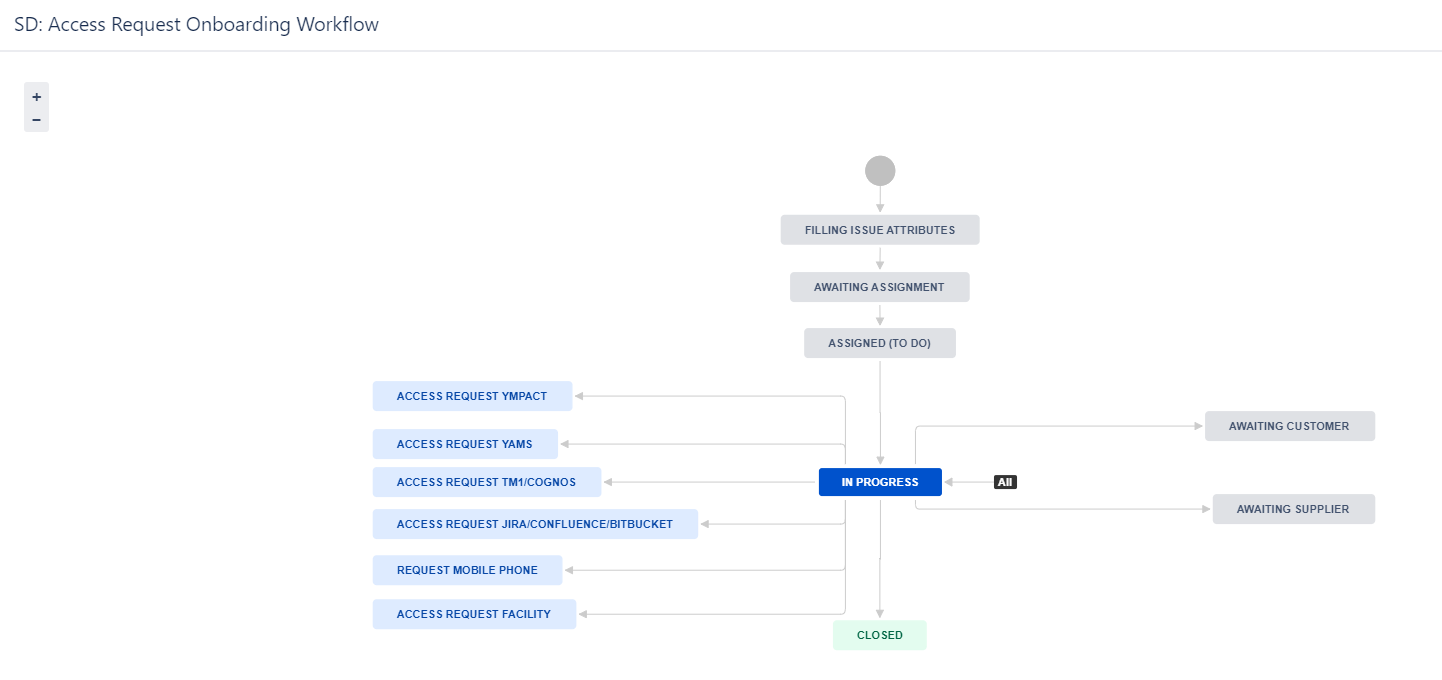
SD: Access Request Onboarding Workflow
SD: Simple 3 step workflow

Transition issue through workflow
Basic information how to transition a issue through a Workflow can be found in: Jira Training Basics - Workflow
Via status in Progress the following statuses can be triggered:
Awaiting Customer status
The Awaiting Customer status is used when more information/response from a customer (Reporter or Requested participant) is required in order to move forward with a issue.
Please also read page How to use @mentions to tag a reporter or a commenter directly.
- Awaiting Customer status can be triggered via the Respond to customer button .

When selecting this option a pop up frame will be opened:
- Check Comment selection (see marked in red in the above screenshot).
Default for comment is set to Internal comment. The Internal comment option can be used for only triggering a status update to Awaiting customer.
Use comment: Respond to customer if your message should be shared with the the reporter and requested participants.- Optional: Add comment to the comment section.
- Optional: Add comment to the comment section.
- Select the Respond to customer button.
- After using the Respond to customer button is pressed the comment will be added to the ticket and status will be changed to Awaiting customer. Description area is optional.

Awaiting supplier
The Awaiting Supplier status is used when more information/response from a customer (Reporter or Requested participant) is required in order to move forward with a issue.
Please also read page How to use @mentions to tag a reporter or a commenter directly.
- Awaiting Customer status can be triggered via the Respond to customer button .

When selecting this option a pop up frame will be opened: - Check Comment selection (see marked in red in the above screenshot).
Default for comment is set to Internal comment. The Internal comment option can be used for only triggering a status update to Awaiting customer.
Use comment: Respond to customer if your message should be shared with the the reporter and requested participants.- Optional: Add comment to the comment section.
- Optional: Add comment to the comment section.
- Select the Respond to customer button.
- After reply from th the Respond to customer button is pressed the comment will be added to the ticket and status will be changed to Awaiting customer. Description area is optional.
- Response from supplier received:
- Via issue: Status will automatically changed back to In Progress.
- Manually: Select status In Progress.

Overview
Content Tools